Tiny ocean treasures tell stories without words.
Have you ever returned from vacation with a collection of beautiful seashells, only to have them sit forgotten in a drawer or jar? I’ve been there too.
I’d gather these perfect little pieces of the ocean, but turning them into something display-worthy seemed like a project meant for someone with actual artistic talent.
But here’s what I found—creating a stunning shadow box display isn’t about artistic skill at all.
It’s about simple techniques anyone can use. With the right background, thoughtful arrangement, and a few insider tricks, those beach souvenirs transform into conversation-starting wall art.
I’ll show you exactly how to create a shadow box that showcases your shells in a way that brings back those sunny beach memories every time you look at it.
Why Use a Shadow Box for Seashells
A shadow box is more than just a frame—it’s a mini museum for your seashell treasures. Unlike jars or loose displays, it protects, preserves, and improves your collection into a impressive piece of decor.
Here’s why a shadow box is the best choice:
- Keeps Shells Safe – Shields indicate shells from dust, moisture, and accidental damage.
- Showcases Their Beauty – Highlights textures, colors, and shapes in a curated way.
- Adds Depth & Dimension – Creates a layered, 3D effect that increase visual impact.
- Blends Art & Memory – Turns sentimental beach finds into personalized coastal decor.
- Customizable & Versatile – Arrange shells in limitless patterns to match your style.
With a shadow box, your shells become more than just souvenirs—they become a striking display of ocean memories.
Choosing the Right Shadow Box
Finding the perfect shadow box for your shell collection sets the foundation for a successful display. The right box complements your shells without competing for attention.
Sizing Matters
Consider both your shell collection and your wall space. A tiny box crammed with shells looks cluttered, while too much empty space seems incomplete.
Measure your largest shells and ensure at least 1-2 inches of clearance from the glass cover.
Depth Considerations
Standard shadow boxes come in depths from 1 to 3 inches. For most shell collections, a 2-inch depth works well.
Larger specimens like conch shells or sand dollars might need deeper boxes. Remember that deeper boxes create more dramatic shadows and dimension.
Frame Styles and Colors
For a coastal feel, weathered wood frames in white, light blue, or natural finishes complement shells beautifully.
Dark frames create striking contrast against lighter shells. Keep the frame simple—your shells should be the stars of the show.
Glass vs. Acrylic
Both options work well, but acrylic offers advantages for shell displays:
- Lighter weight makes hanging easier
- More resistant to breakage
- Less glare when viewing the display
- Often less expensive
Prepping Your Seashells for Display
Before arranging your seashells in a shadow box, proper cleaning and preparation ensure they look their best.
1. Clean Off Sand and Debris
- Rinse shells under warm water to remove loose sand and dirt.
- Use a soft toothbrush to scrub crevices gently.
2. Remove Odors and Residue
Soak shells in a mixture of 50% water and 50% vinegar for 15–30 minutes.For stubborn grime, add a small drop of dish soap and scrub lightly.
Avoid soaking dainty shells too long, as vinegar can erode them.
3. Brighten and Restore Color
- For extra whitening, soak in a 50/50 bleach and water solution for 10 minutes.
- Rinse thoroughly and let dry completely.
4. Improvise Shine (Optional)
Apply a thin layer of mineral oil or clear acrylic spray for a glossy finish.Let them dry for at least an hour before handling.
Once your shells are clean, dry, and polished, they’re ready to be arranged into a beautiful shadow box display!
Top Recommended Ideas of Seashell Display in A Shadow Box
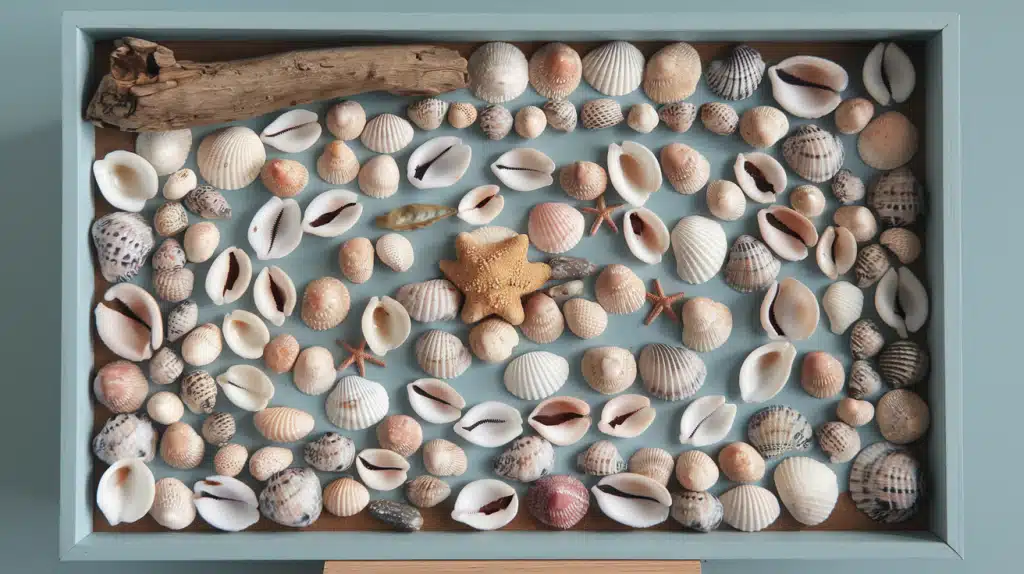
1. Beach Memory Collage

- Background Choice: Burlap or a sandy-textured surface.
- Shell Arrangement: Scattered naturally with photos in between.
- Additional Elements: Mini vacation photos, small pebbles, and driftwood.
- Personalization: Add a tiny message in a bottle with a handwritten note.
2. Monogram Shell Art
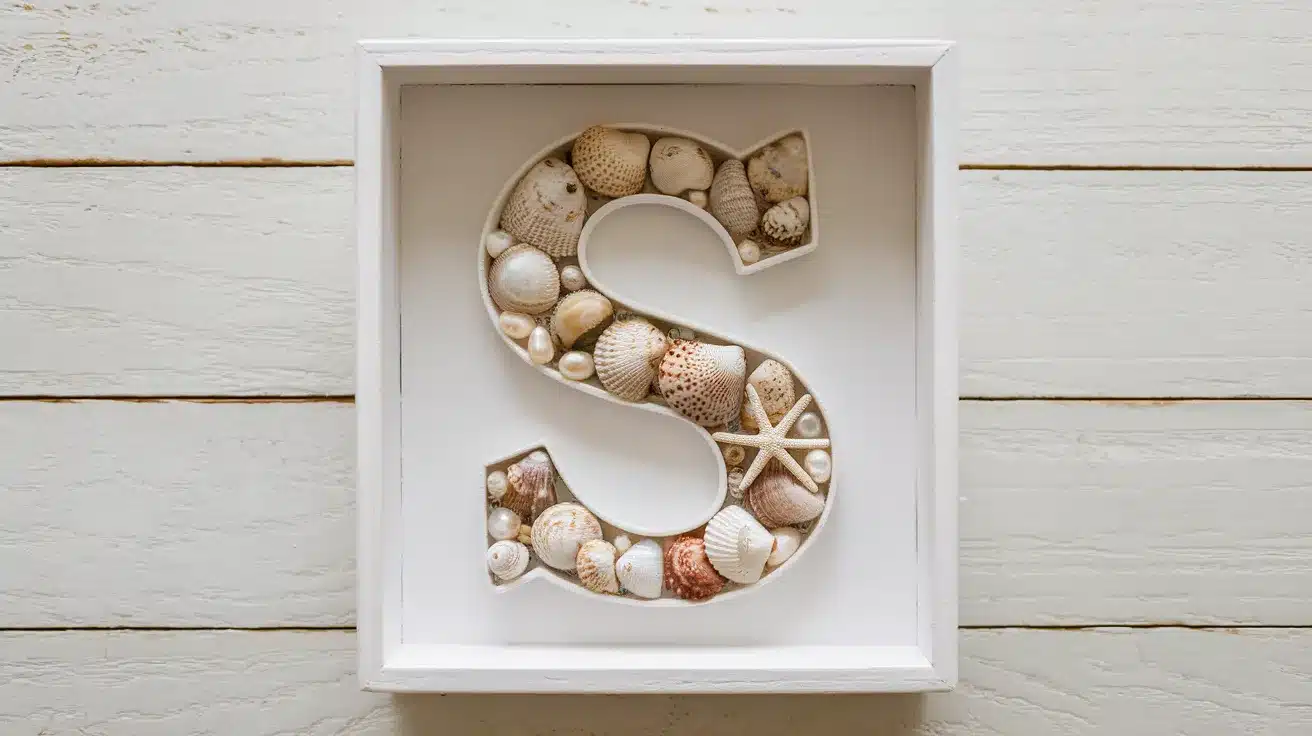
- Background Choice: painted Wood or A Linen Fabric.
- Shell Arrangement: shells Forming an Initial (e.G., “s” for Sarah).
- Additional Elements: starfish, Pearls, or Tiny Pieces of Coral.
- Personalization: name or Special Date Painted or Added with Vinyl Letters.
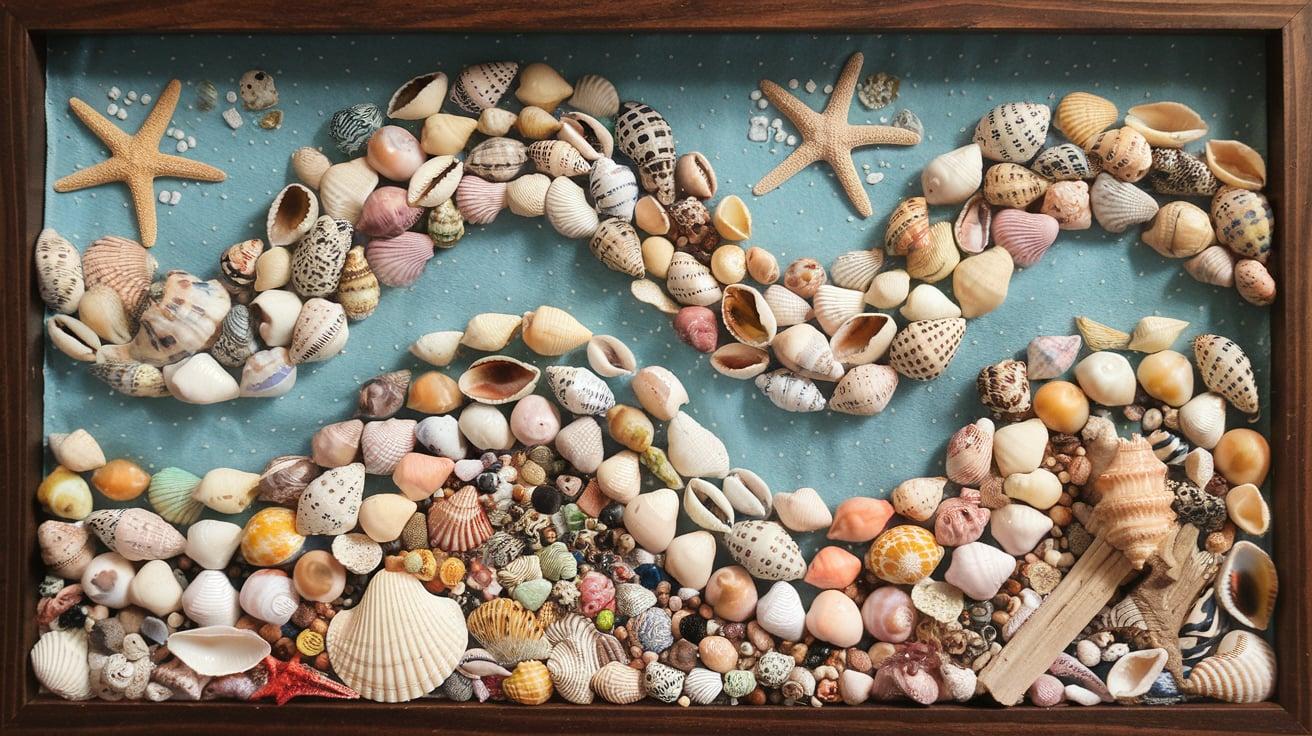
3. Ocean Wave Resin Effect

- Background Choice: a Wooden Board with A Resin-Poured Blue Ocean Effect.
- Shell Arrangement: clustered Along the “shoreline” with A Gradient Effect.
- Additional Elements: white Resin for Wave Foam, Sand, and Sea Glass.
- Personalization: engraved or Painted Quote Like “the Ocean Is Calling.”
4. Nautical-Themed Shell Box
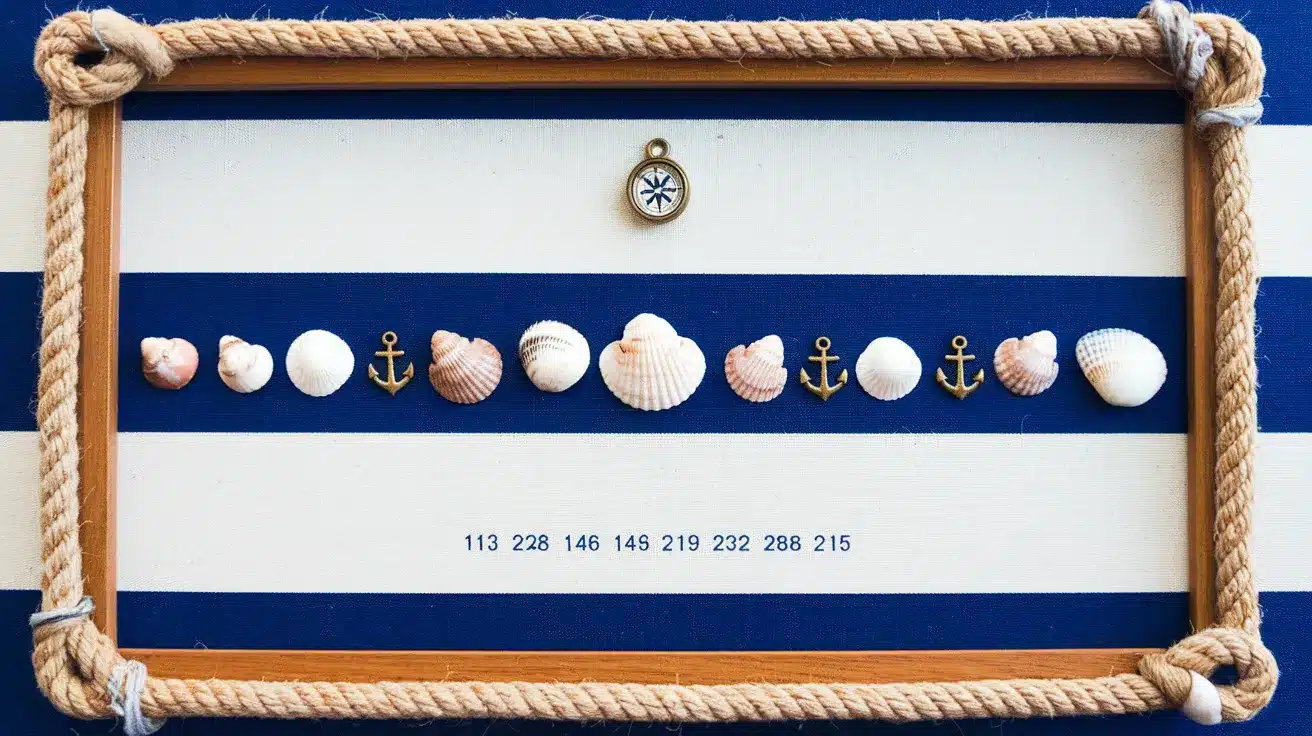
- Background Choice: blue and White Striped Fabric or A Ship Map Print.
- Shell Arrangement: neatly Aligned with Small Gaps for A Clean Look.
- Additional Elements: mini Anchor Charms, Rope, and A Tiny Compass.
- Personalization: stamped or Printed Coordinates of A Favorite Beach.
5. Heart-Shaped Shell Design
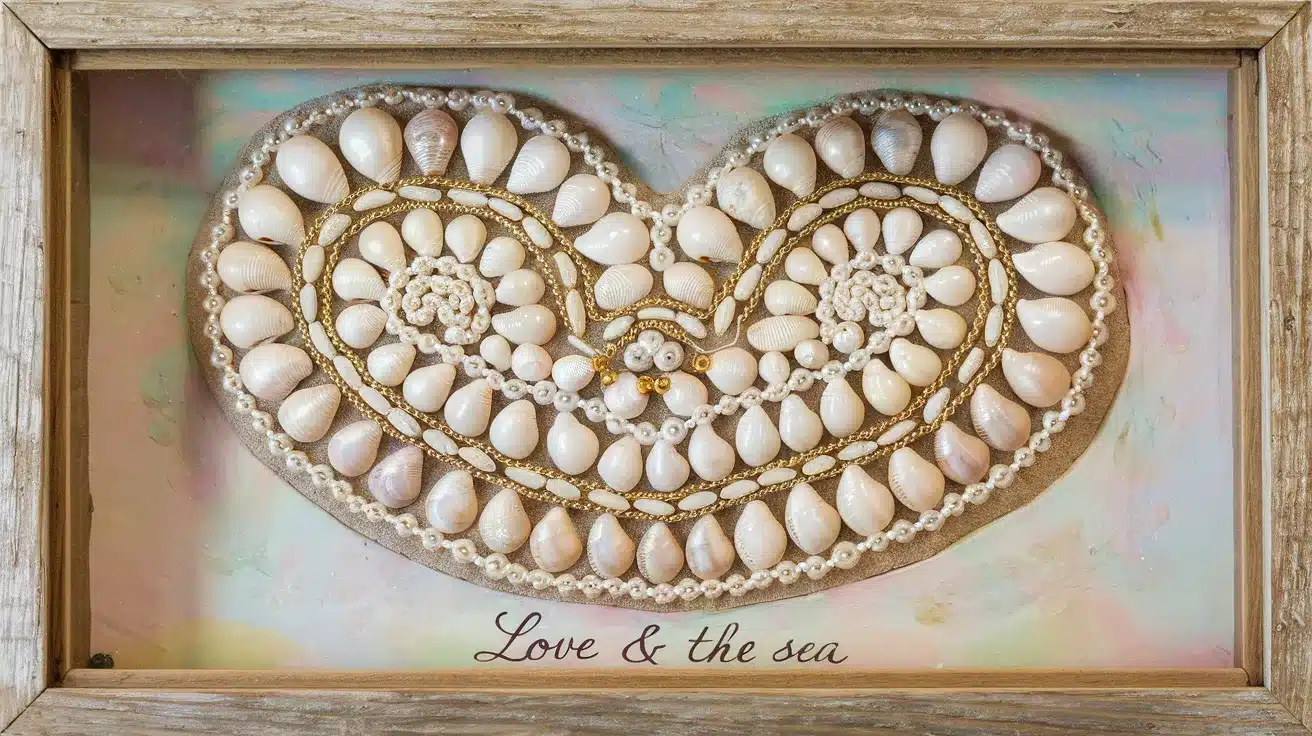
- Background Choice: soft Pastel or A Rustic Wooden Frame.
- Shell Arrangement: a Heart Shape Using Mixed-Sized Shells.
- Additional Elements: tiny Beads or Pearls Around the Heart Edges.
- Personalization: “love & the Sea” or A Couple’s Initials at The Bottom.
6. Minimalist White Shell Display
- Background Choice: white Shadow Box Frame with A Plain White or Beige Fabric.
- Shell Arrangement: single Centered Shell or Symmetrical Design.
- Additional Elements: a Touch of Gold Paint on Shell Edges for Elegance.
- Personalization: a Subtle, Embossed Beach Quote at The Bottom.
7. Driftwood and Shell Natural Scene
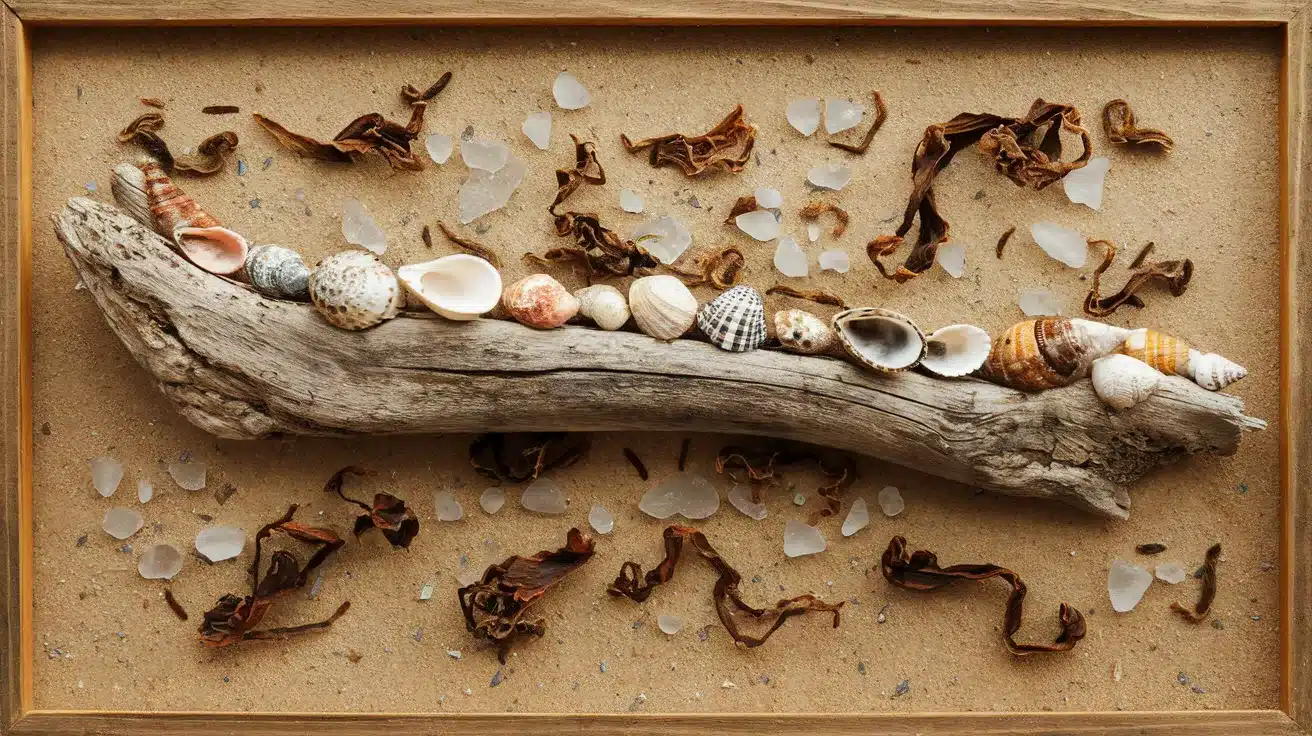
- Background Choice: weathered Driftwood Plank or A Sand-Colored Board.
- Shell Arrangement: placed Naturally Along a Driftwood Piece.
- Additional Elements: small Dried Seaweed, Pebbles, and Sea Glass.
- Personalization: a Handwritten Note Attached with Twine.
8. Seashell Mandala Design
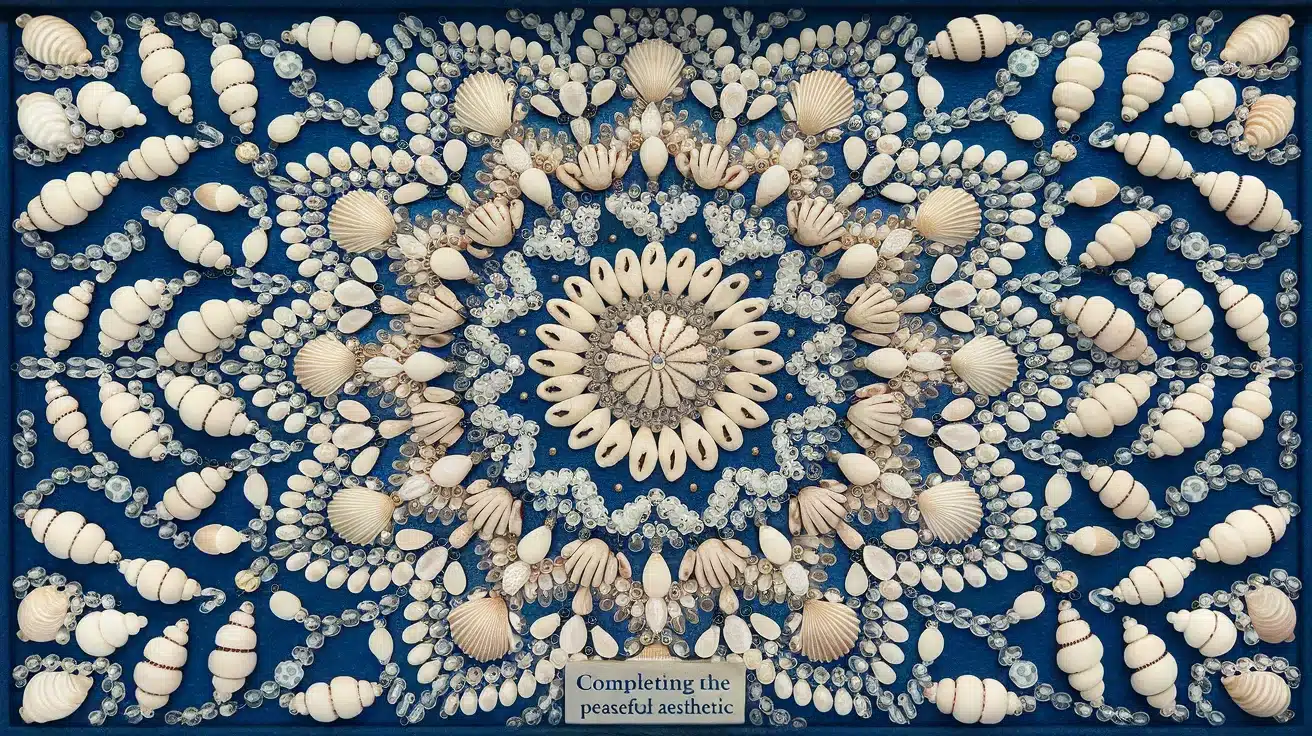
- Background Choice: deep Blue or Teal Fabric for Contrast.
- Shell Arrangement: circular Mandala Pattern with Different Shell Types.
- Additional Elements: tiny Beads or Crushed Sea Glass for Detail.
- Personalization: a Small Plaque with A Word Like “balance” or “tranquility.”
9. Sunset Beach Scene
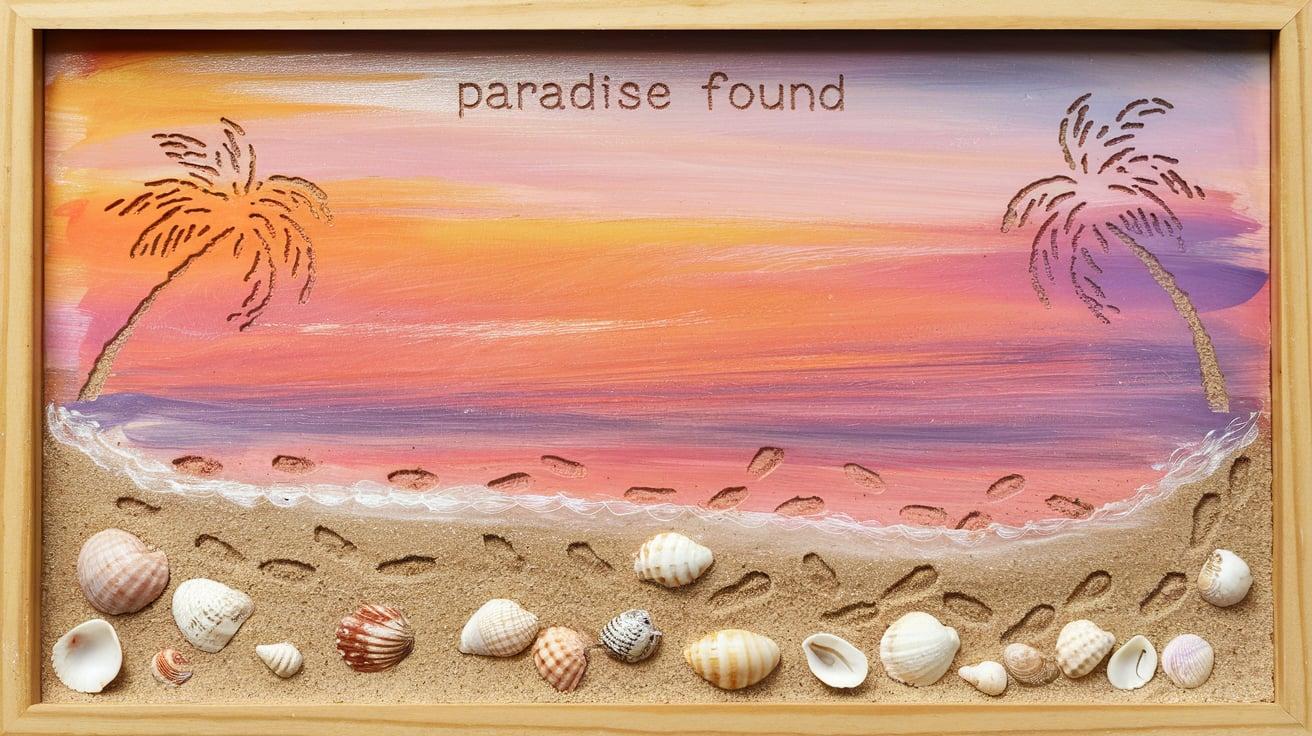
- Background Choice: gradient-Painted Background Resembling a Sunset.
- Shell Arrangement: placed Along a Faux Shoreline with Some Half-Buried in Resin.
- Additional Elements: mini Umbrella, Tiny Footprints in Sand Texture.
- Personalization: “paradise Found” or A Favorite Vacation Spot Name.
10. Message in A Bottle Theme
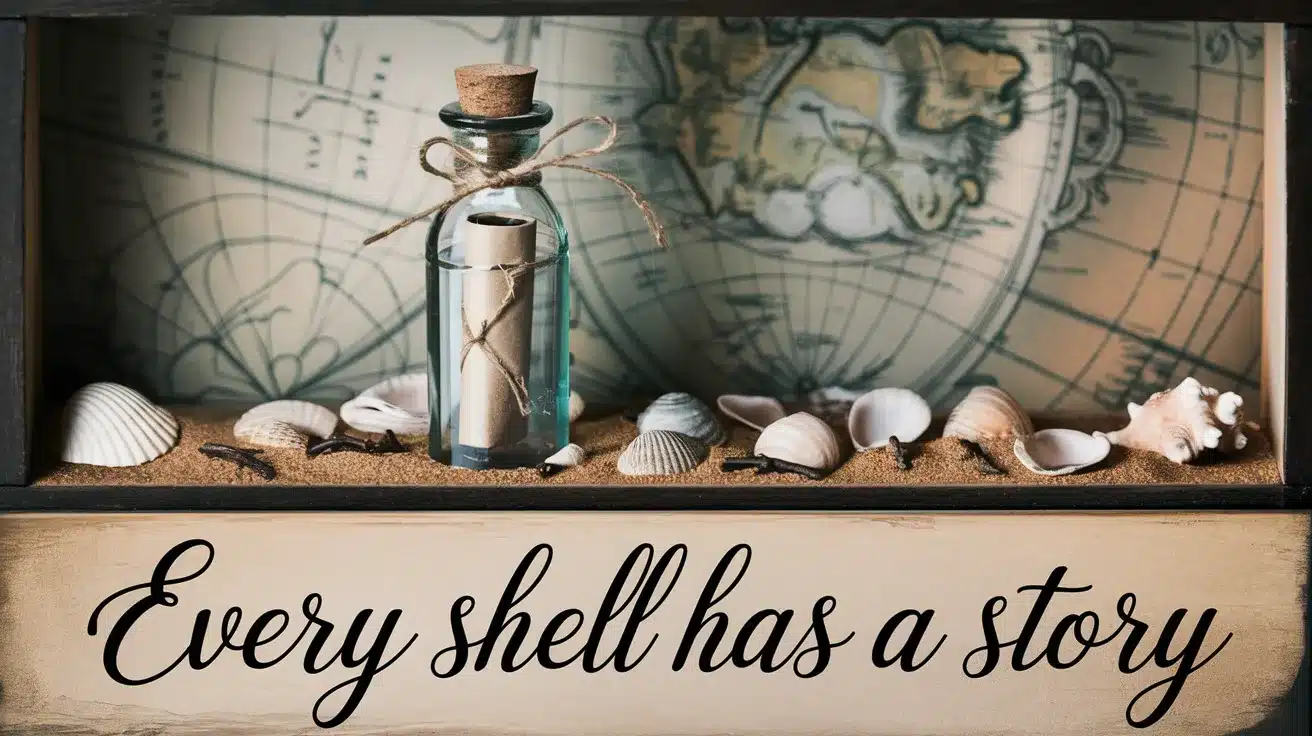
- Background Choice: old Map Print or Vintage-Style Paper.
- Shell Arrangement: scattered Shells Surrounding a Tiny Bottle.
- Additional Elements: rolled-Up Message Inside the Bottle, Small Twigs.
- Personalization: a Meaningful Quote Like “every Shell Has a Story.”
Securing Shells Without Damage
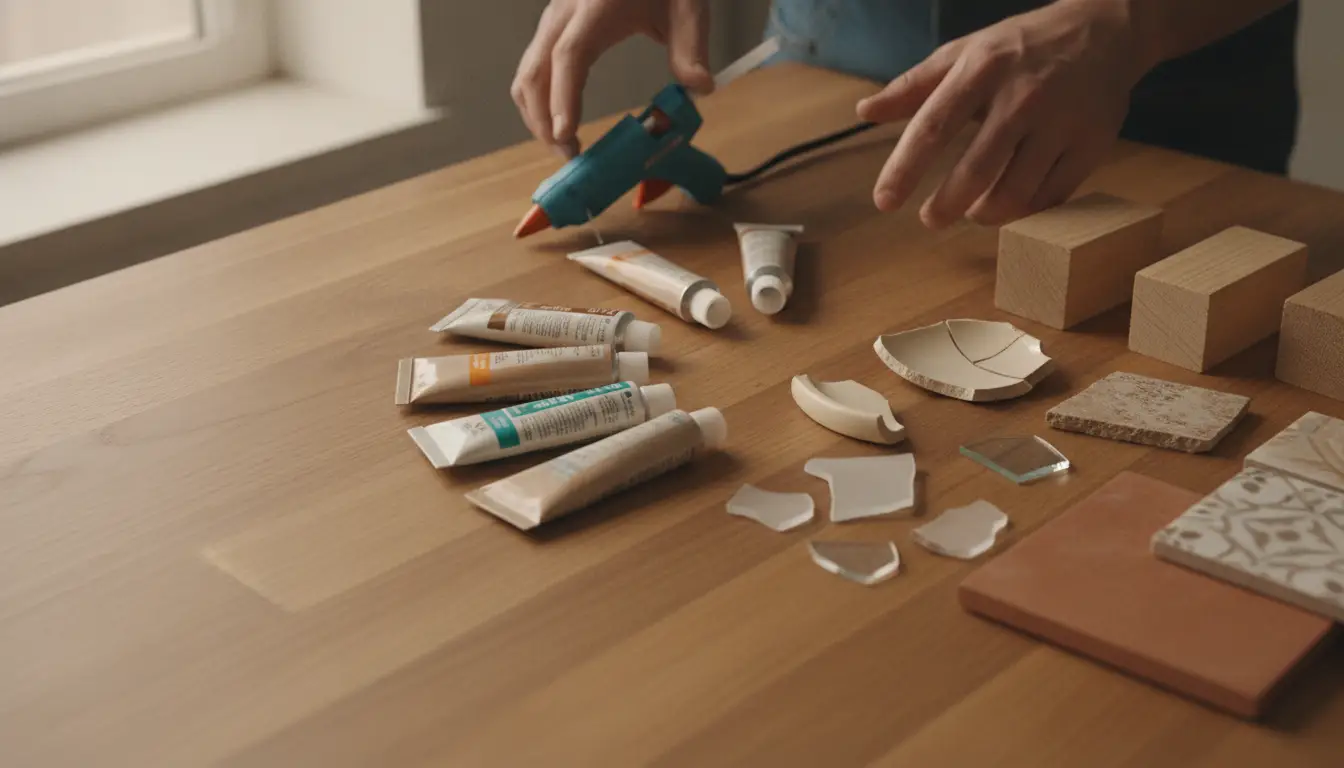
1. Choosing the Right Adhesive
The best way to secure shells without damage is by using the right adhesive. Hot glue is a popular choice because it’s strong and dries quickly, but it can be tricky for dainty shells.
For a more gentle option, museum putty or removable adhesive strips work well, especially if you might want to rearrange your shells later.
If You’re Creating a Permanent Display, Clear Epoxy Glue Provides a Firm Hold without Yellowing Over Time.
2. Applying Adhesive Properly
To avoid excess glue showing, apply a small dab to the back or a flatter surface of the shell rather than covering the entire base.
If using hot glue, let it cool slightly before pressing the shell into place to prevent melting or scorching fragile shells.
For lighter shells, a tiny dot of craft glue may be enough to hold them securely.
3. Alternative Non-Permanent Methods
If you want to keep your shells damage-free and repositionable, consider using double-sided foam tape, adhesive velcro dots, or small pins for a floating effect.
These Methods Allow You to Adjust the Layout without Committing to A Permanent Placement.
4. Avoiding Pressure and Breakage
No matter what adhesive you use, avoid pressing too hard when attaching shells. Fragile shells, like sand dollars or thin spiral shells, can crack under too much pressure.
If your shells are particularly dainty, test a small amount of adhesive on a hidden area first to ensure it doesn’t react negatively with the material.
By choosing the right adhesive and applying it carefully, you can secure your shells without damage, keeping your shadow box display both beautiful and long-lasting.
Final Touches for A Impressive Look
Small details transform ordinary shell displays into conversation pieces. Perfect your shadow box with these finishing touches:
Light brings shells to life—position your display where soft natural light highlights textures without causing fading.
For evening drama, tuck small battery le ds inside the frame to cast gentle shadows that emphasize shell contours.
Create context with minimal labeling.
Tiny handwritten notes identifying special specimens or their beach origins add personal significance without cluttering your composition. For prized finds, consider where viewers’ eyes will naturally travel and place these shells in those sweet spots.
Background choices dramatically impact shell visibility. A simple gradient wash suggesting ocean depths or a thin layer of actual beach sand creates authenticity that plain cardboard can’t match.
Seal your display properly with uv-protective glass and dust-proof backing.
These protective measures ensure your beach treasures remain vibrant for years while maintaining their natural beauty.
Create a Impressive Seashell Shadow Box at Home
There’s something special about collecting seashells—they hold memories of sunny beach days and the soothing sound of waves.
Instead of keeping them tucked away, why not turn them into a beautiful shadow box display?
This craft is perfect for a rainy day and makes for a wonderful keepsake or gift.
Tools & Materials You’ll Need
| Tools | Materials |
|---|---|
| Shadow box frame (8×8 or desired size) | Assorted seashells (small and flat work best) |
| Compass (or a circular template) | Background paper or fabric (optional) |
| Pencil | Hot glue gun and glue sticks |
| Ruler or measuring tape | Clear sealant (optional, to enhance shell shine) |
| Cutting mat (optional) | Hanging Hardware (if Needed) |
Step-By-Step Instructions
Step 1: Prepare Your Shadow Box
- Remove the backing from the shadow box frame.
- Ensure the hanging hardware is positioned at the top to avoid mounting issues later.
- Place the backing on a cutting mat or flat surface to work on comfortably.
Step 2: Find the Center of The Backing
- Using a ruler, measure and mark the center of the backing with a light pencil mark.
- If your frame is 8×8 inches, mark the center at 4 inches From each edge.
- This Step Ensures a Balanced, Symmetrical Design.
Step 3: Draw a Guiding Circle for Shell Placement
- Take a compass and set the width to 3 inches (or adjust based on frame size).
- Place the point of the compass on your center mark and draw a faint circular outline—this will be your shell arrangement guide.
- If you don’t have a compass, Use a small bowl or round object as a stencil.
Step 4: Select and Arrange Your Shells
- Choose shells that are relatively flat and under an inch in size so they don’t press against the glass.
- Begin placing shells at the 12, 3, 6, and 9 o’clock positions, as if forming a clock face.
- Continue adding shells along the guideline, spacing them evenly and using a Mix of sizes and shapes for variety.
- Play around with the arrangement before gluing to ensure the best look.
Step 5: Secure the Shells with Hot Glue
- Once satisfied with the layout, carefully glue each shell onto the backing.
- Apply a small amount of hot glue to the base of each shell and press it down gently.
- Work in Sections, Ensuring Shells Are Secure Before Moving On.
Step 6: Assemble the Shadow Box
- Once all the shells are Glued and dry, gently brush off Any stray glue strands.
- If desired, spray a clear sealant over the shells for a polished finish.
- Place the backing back into the shadow box frame and secure it.
Step 7: Display and Enjoy
- Find the perfect spot to hang or place your new beach-inspired decor.
- Group it with other coastal elements like driftwood and sea glass for a impressive effect.
- Admire your work—a piece of the beach, beautifully preserved!
For a more detailed tutorial on how to display seashells in a shadow box, check out the video below:
Conclusion
Creating a striking seashell display takes creativity, patience, and attention to detail.
By following the steps outlined in this guide, you can transform your beach treasures into an eye-catching home decoration that preserves your memories.
Your shadow box becomes more than decoration—it’s a personal story told through carefully arranged natural finds.
We’d love to see your finished shadow box!
Share your creation in the comments below and tell us about your favorite shell-collecting experience.
Your different approach might inspire our community’s next beautiful display.