That empty wall in your house is not just a blank space; it’s a chance to create something unique. An effective statement wall can immediately make your room look better, represent your character, and unite all your decor. However, when you have ever found yourself confused by options – sizes, styles, colors – you are not alone. The good news? You can easily create a statement wall; it doesn’t need to be complicated.
Consider this your easy, home-cooked manual for making that dull wall really noticeable. In this article, we’ll explain some practical steps; just follow these steps, and you’ll be able to create a stylish and unique space.
Step 1: Start with the Great Plan
You should plan before making a selection of artwork. A statement wall should be both purposeful and not accidental.
Select the right wall before starting. Find a spot that is naturally attractive, such as the wall behind your sofa, the wall above your bed, or the first wall you see as you enter the room. These spots are already focal points, and introducing art adds to them.
Also, consider lighting. A bright wall will help to make your artwork shine whereas a dark corner may conceal the beauty. Daytime natural light and evening soft light can totally transform the appearance of your art.
Lastly, consider the mood you desire. Would you like something subtle and simple or vivid and catchy? Your wall should match the space of your room.
Step 2: Choose Artwork That Speaks to You
The next step is the fun part, the choice of the art. The point is in the fact that you should select something you really like. Styles come and go, but personal preference never goes astray.
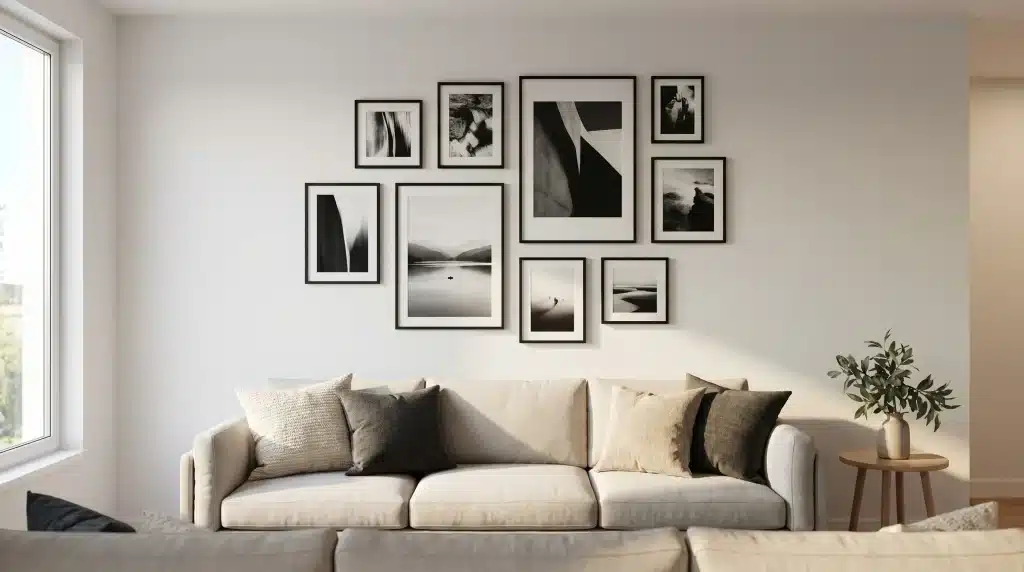
If you desire a classic and less messy aesthetic, you should consider black and white wall art. It is adaptable, sleek, and complements nearly every color palette. Black and white pieces do not overload your room but add sophistication, whether your style is modern or traditional.
There are also choices with regard to layout. One big artwork will be a bold center, and a series of artworks can make a narrative on your wall. If you don’t want to worry about matching different artworks yourself, wall art sets are a great solution.
The idea is to select art as something that makes you feel like yourself. You find something to love when looking, and your area immediately becomes much more intimate and welcoming.
Step 3: Get the Size Right
The most common error people make is choosing the wrong size for a work of art. Too small and it is lost. Too big, and it can overwhelm the room.
To match your art to your furniture is a good rule. When you have it hung over a sofa or a bed, the artwork should be approximately two-thirds the width of the piece of furniture. This brings about equilibrium, and the space looks well-designed.
In the case of unoccupied walls, attempt to cover about 5060 percent of the space. This ensures your statement piece is easily noticeable without overloading the wall.
An easy tip here is that you can mark out the size of your piece using painter tape on the wall and purchase it. This will assist you in visualizing its appearance and prevent expensive errors.
Step 4: Don’t Ignore the Frame
The frame is often overlooked, but it is much more than a border; it acts as a critical link between your artwork and the room’s overall decor.
Simple black, white or natural wood frames are the way to go to get a modern appearance. If your style is more traditional or ornamental, you may want to select something more elaborate or fancy.
The black frames are particularly effective with monochrome pieces, providing contrast and making the art piece stand out. Wooden frames are cozy, and a metallic finish can be used to introduce luxury.
The choice of whether to use a mount (the white border within the frame) or not is also at your disposal.
Step 5: Hang It Like a Pro
After deciding on your artwork, you now have to hang it. Location is everything, and rush to nothing.
The standard is to have art hung on the eye level, in this case, the general rule would be that the center should be approximately 57-60 inches off the floor. When fitting it above furniture, leave the bottom of the frame approximately 6-8 inches above the furniture.
Take Your Idea to the Next Level
No professional design is needed to create a statement wall; it takes planning and the correct selections. When choosing the right artwork to display, finding the right size and the right placement, each component contributes to the end product.
You may choose to play with the eternal beauty of black and white wall art, or you can opt for the convenience of a set of perfectly matched wall art, but the most important thing is to make it your home.
Don’t hurry, follow your intuition, and have fun. That empty wall? It is almost going to be your favorite part of the room.