Are you tired of plain candles that lack appeal?
Many candle fans spend hours looking for unique items that bring warmth to their homes. The blend of wax light and ocean finds creates candles with seashells that stand out from regular options.
Want to know how simple ocean shells can turn basic candles into eye-catching focal points? These natural items from the beach add a quality that store-bought products can’t offer.
With this guide, you’ll see how easy it is to make your shell-added candles with seashells. The soft light from the shell patterns will paint gentle shadows on your walls.
Ready to bring a bit of beach charm into your home? Let’s look at how to make these coastal treasures yourself.
The Coastal Glow Trend: Candles with Seashells Are Taking Over
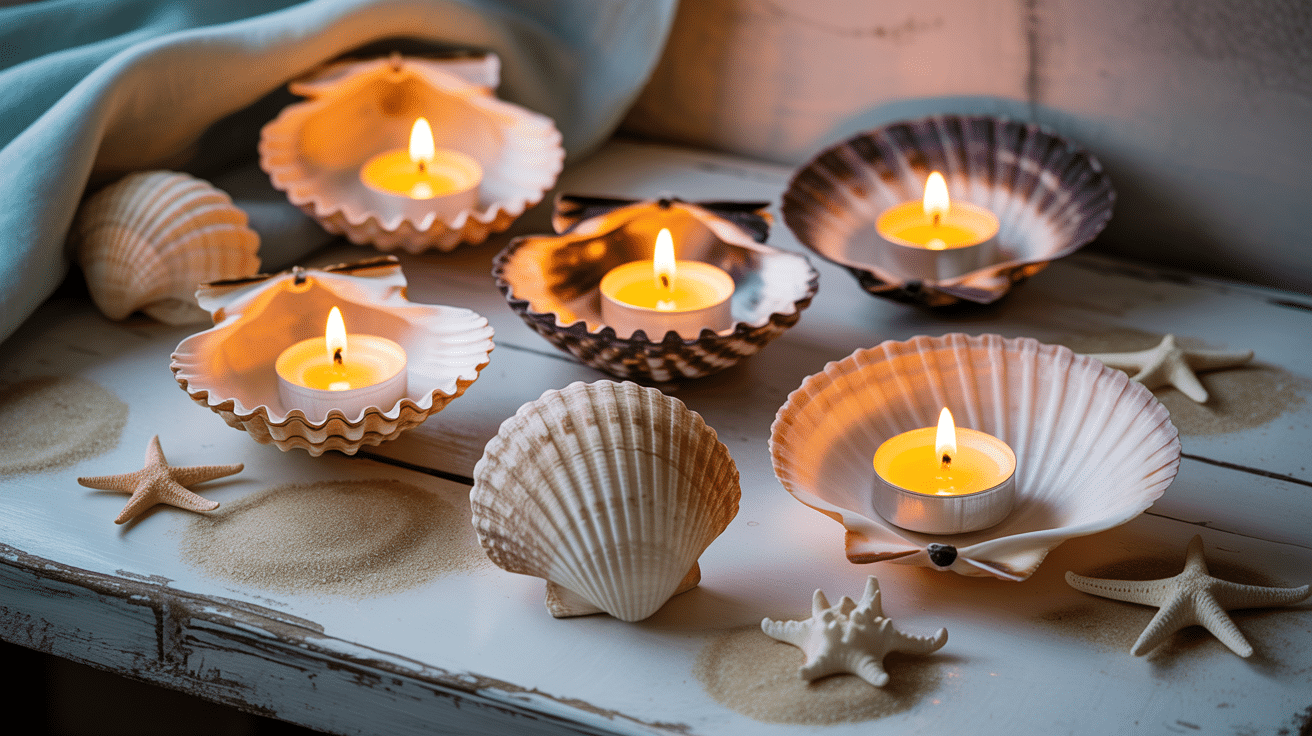
Beach-themed home items have become very popular lately, with candles with seashells at the front of this movement. This pairing brings a touch of coastal peace to any room without needing a beach house.
Home craft fans have shared their shell-decorated candles on social media, and this style has grown quickly among DIY lovers. The soft light coming through the shell patterns makes a gentle glow that changes plain walls into something worth looking at.
What makes candles with seashells so popular?
People feel drawn to the mix of nature and craft. The shells bring back thoughts of beach trips and good times by the water. These items work well in any season, not just summer. They add comfort to fall nights and bring beach thoughts to winter days when the coast seems so far.
Making them at home costs much less than buying ready-made ones in stores.
Tools and Materials Required
| Tools/Materials | Purpose |
|---|---|
| Seashells | Candle holders: choose deep, stable shells |
| Wax flakes or old tealights | Main candle material |
| Candle wicks (or from tealights) | To create the candle flame |
| Glue dots or a hot glue gun | To secure the wick in the shell |
| Clean tin can | Melting wax (double boiler method) |
| Pan | For the water bath to melt wax safely |
| Scissors | Trimming wicks |
| Gold acrylic paint & brush (optional) | Decorative touch for shell edges |
| Greaseproof paper | To catch wax drips during pouring |
Making Your Candles with Seashells at Home
Want to bring a bit of beach feeling into your home? Making candles with seashells is easier than you might think. With just a few basic items and some simple steps, you can create beautiful light sources that remind you of sunny days by the water.
These handmade items make great gifts or personal touches for your home. The process is fun and lets you get creative with colors and scents.
Step 1: Select and Prepare Your Seashells
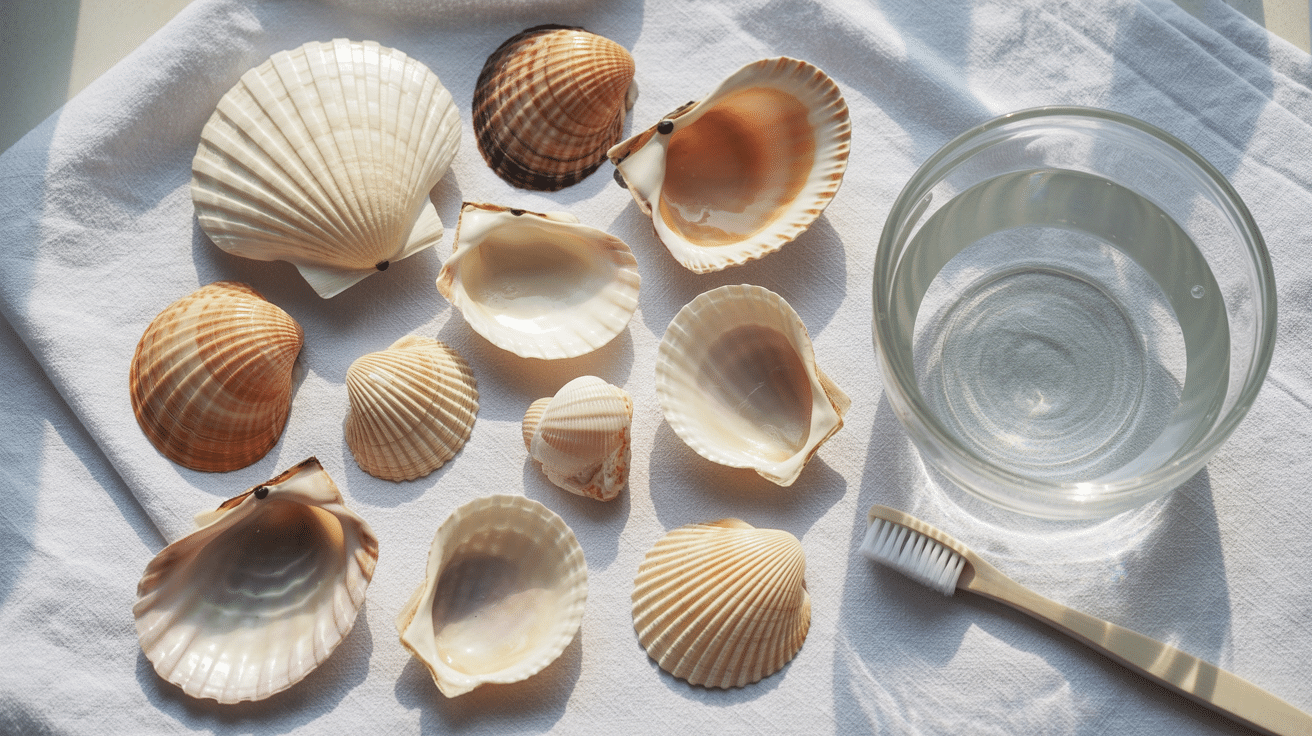
Choose deep, stable shells that can hold a good amount of wax. Bigger shells like scallops, clams, or conch work well for this project. Make sure they sit flat on a surface without tipping over.
Clean the shells by soaking them in warm, soapy water for 30 minutes. Scrub away any sand or dirt with an old toothbrush. Rinse them well under running water and set them out to dry completely for 24 hours. Any moisture left in the shells can cause problems when you add hot wax.
For extra safety, bake clean shells in the oven at 175°F for 20 minutes to make sure they’re fully dry and clean.
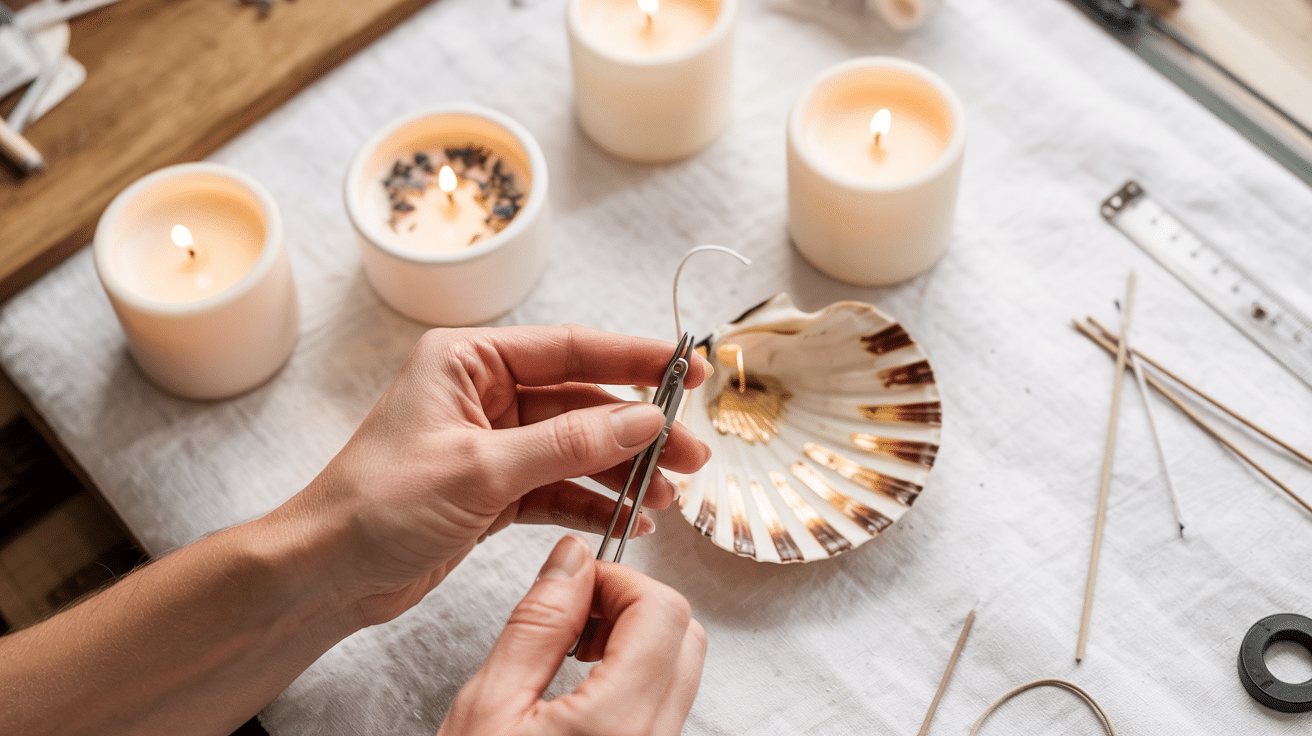
Step 2: Secure the Wick
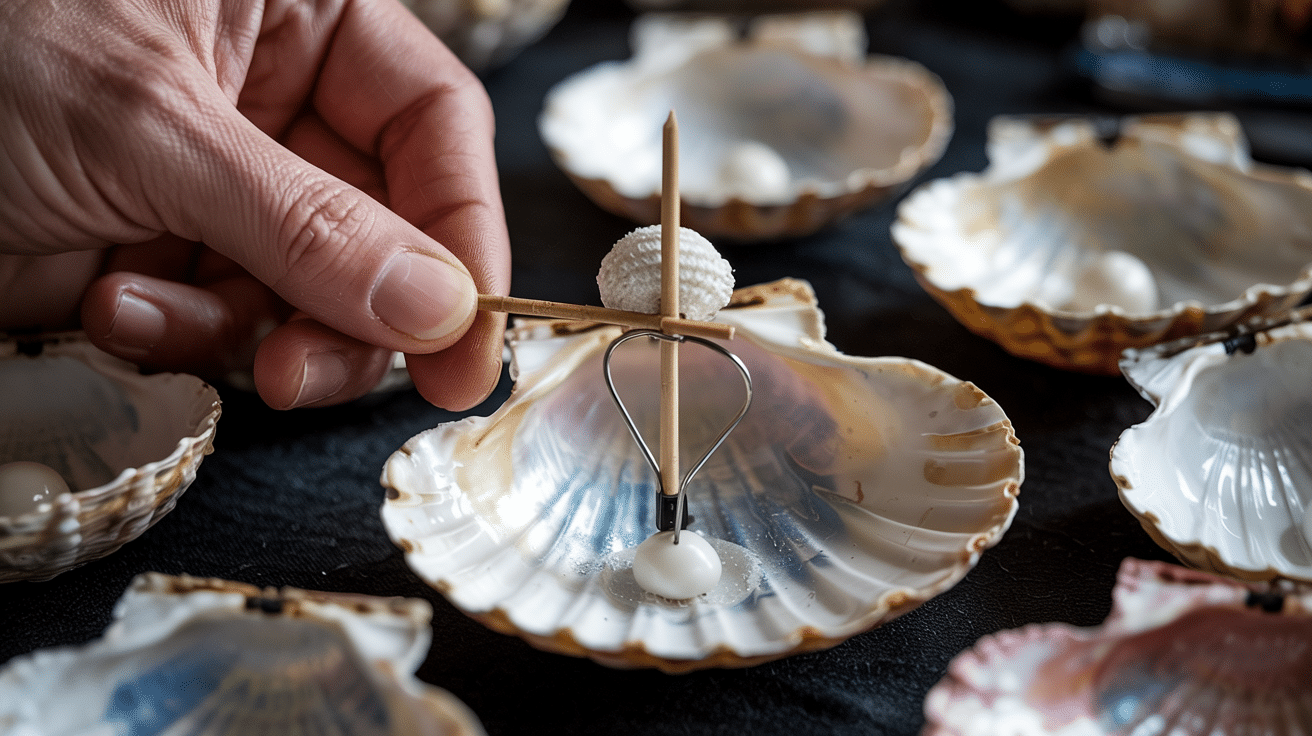
Put a small dot of heat-safe glue in the center of each shell. Press the metal base of your candle wick into this glue spot. Hold it in place for about 30 seconds until it sets.
To keep the wick standing up straight while you work, use a pencil or chopstick to wrap the top of the wick around. Rest this tool across the top of your shell so the wick stays centered and tall.
For smaller shells, trim your wick to a shorter length before gluing it down.
Step 3: Melt the Wax

Set up a double boiler by putting a heat-safe glass bowl or clean tin can into a pot with about 2 inches of water. The water should not touch the bottom of the bowl.
Add your wax flakes or old candle pieces to the bowl. Soy or beeswax are good options for clean burning.
Heat the water on medium-low until it simmers. Stir the wax often as it melts.
If you want colored candles, add a small amount of candle dye when the wax is fully melted. For scent, add 10-15 drops of essential oil and stir well.
Keep the heat low to prevent any smoke or fire issues.
Step 4: Pour the Wax
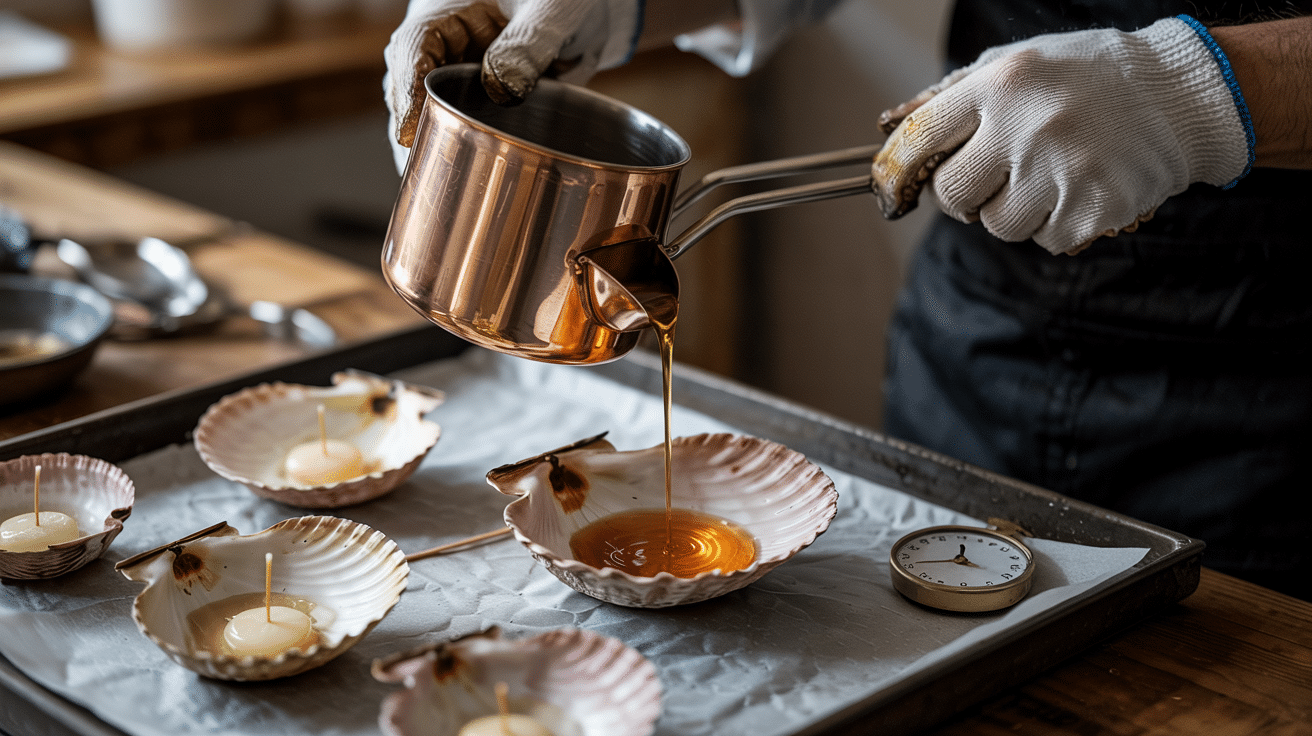
Once your wax is fully melted and mixed, turn off the heat and let it cool for 2-3 minutes. Place your shells on wax paper or aluminum foil to catch any spills.
Using a heat-safe pouring cup with a spout, slowly pour the wax into each shell, filling it to about 1/4 inch from the top. If you see any air bubbles, gently tap the side of the shell to help them rise to the surface.
Work quickly but carefully, as the wax will start to harden as it cools.
Step 5: Set, Trim, and Decorate
Let your candles cool and harden fully. This takes about 2-4 hours at room temperature.
Once hard, trim the wick to about 1/4 inch above the wax surface. A longer wick can create too much smoke and an uneven burn.
For a pretty finish, you can paint the edges of the shells with craft paint. Gold or silver looks lovely against the natural shell color. Let the paint dry fully before handling.
To extend the life of your candles, store them in a cool, dark place until you’re ready to use them.
Creative Ways to Display Seashell Candles in Your Home
Looking for ways to show off your handmade shell candles?
How you present these coastal treasures can make a big difference in your home’s look and feel. Here are some fresh ideas to help your candles shine in every room of your house.
1. Display in Shadow Boxes
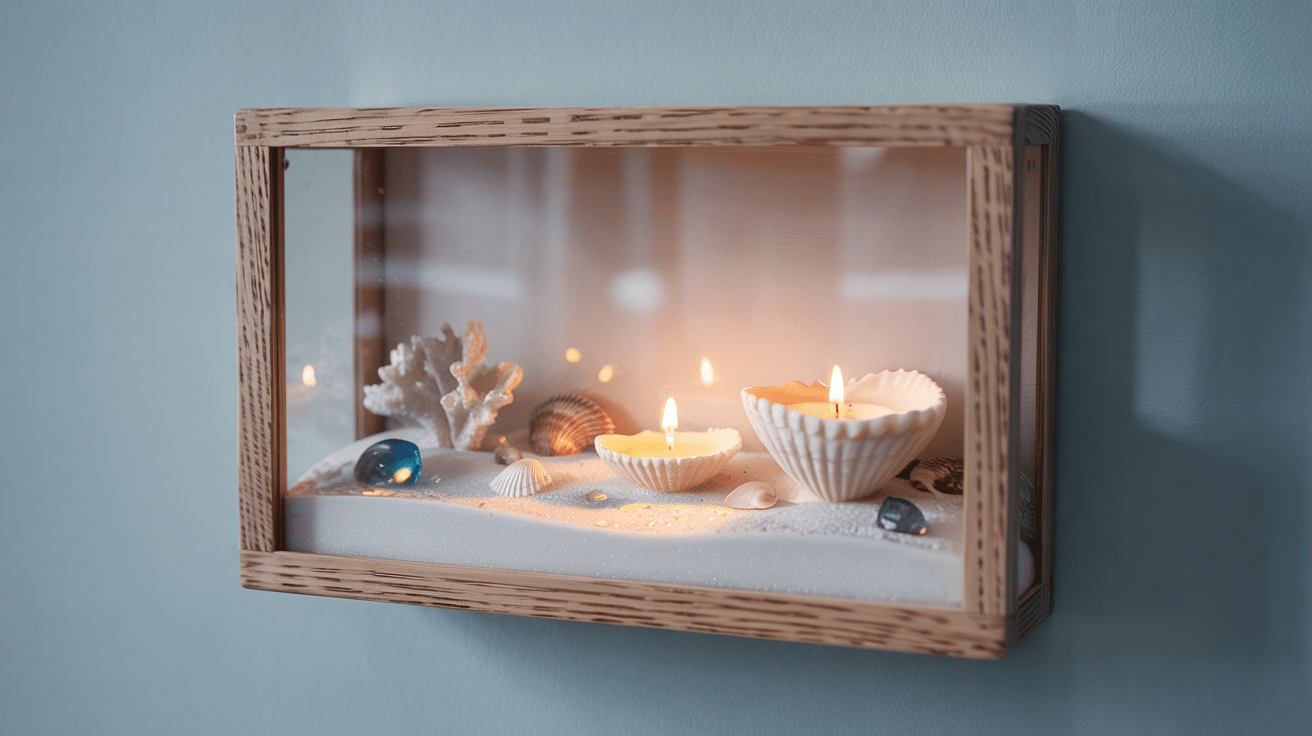
Set your shell candles in deep shadow boxes to create wall art. Add a base layer of sand and sprinkle tiny shells around it.
These boxes protect the candles and turn them into three-dimensional art. You can light them for special occasions or enjoy them as static displays.
This method works well for smaller shell candles that might get lost on a large table. For a more detailed description, check out our blog “How to Display Seashells in a Shadow Box Beautifully“.
2. Nestle in Glass Lanterns
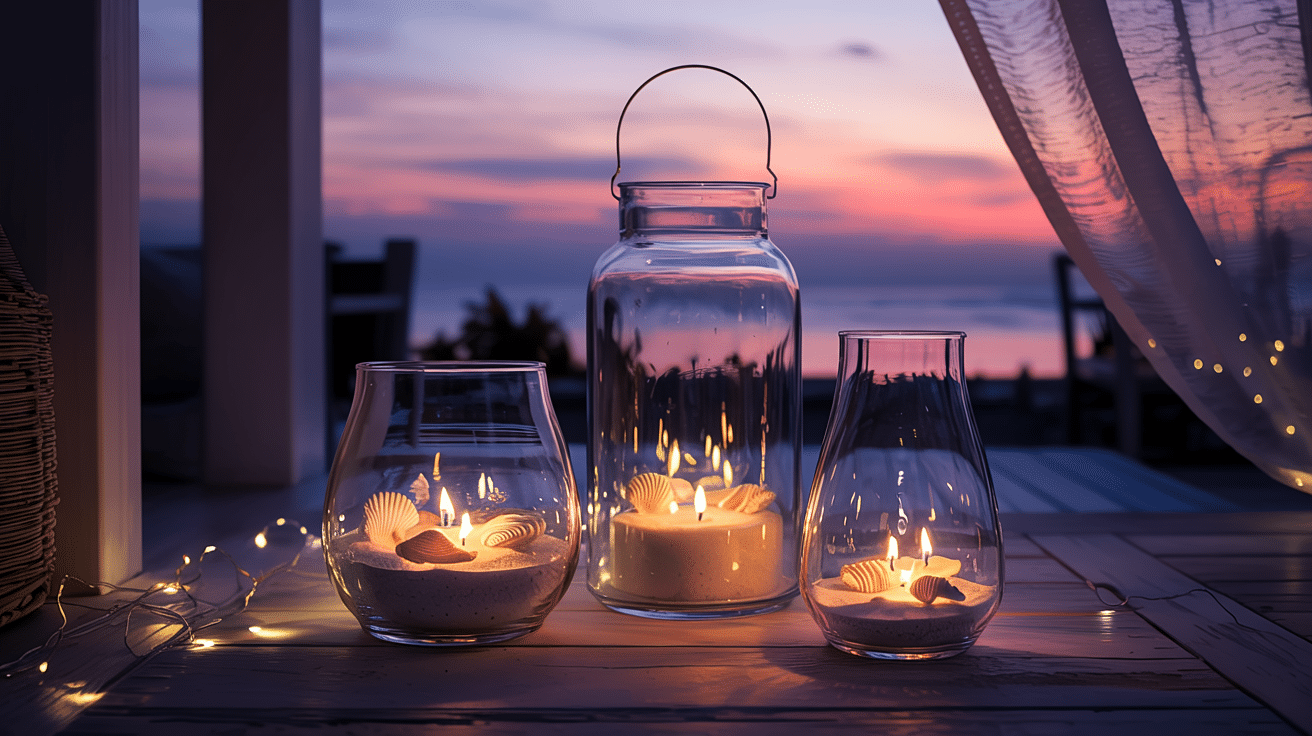
Tuck your shell candles inside clear glass lanterns for both style and safety. The glass offers wind protection for outdoor use while creating a magnified light effect.
Try lanterns of different heights grouped on a porch or patio. The mixture of tall and short creates a more interesting visual. The glass walls also help prevent wax from dripping onto furniture.
This setup works well in entryways, too, giving guests a warm welcome with soft lighting.
3. Create a Coastal Tray Arrangement
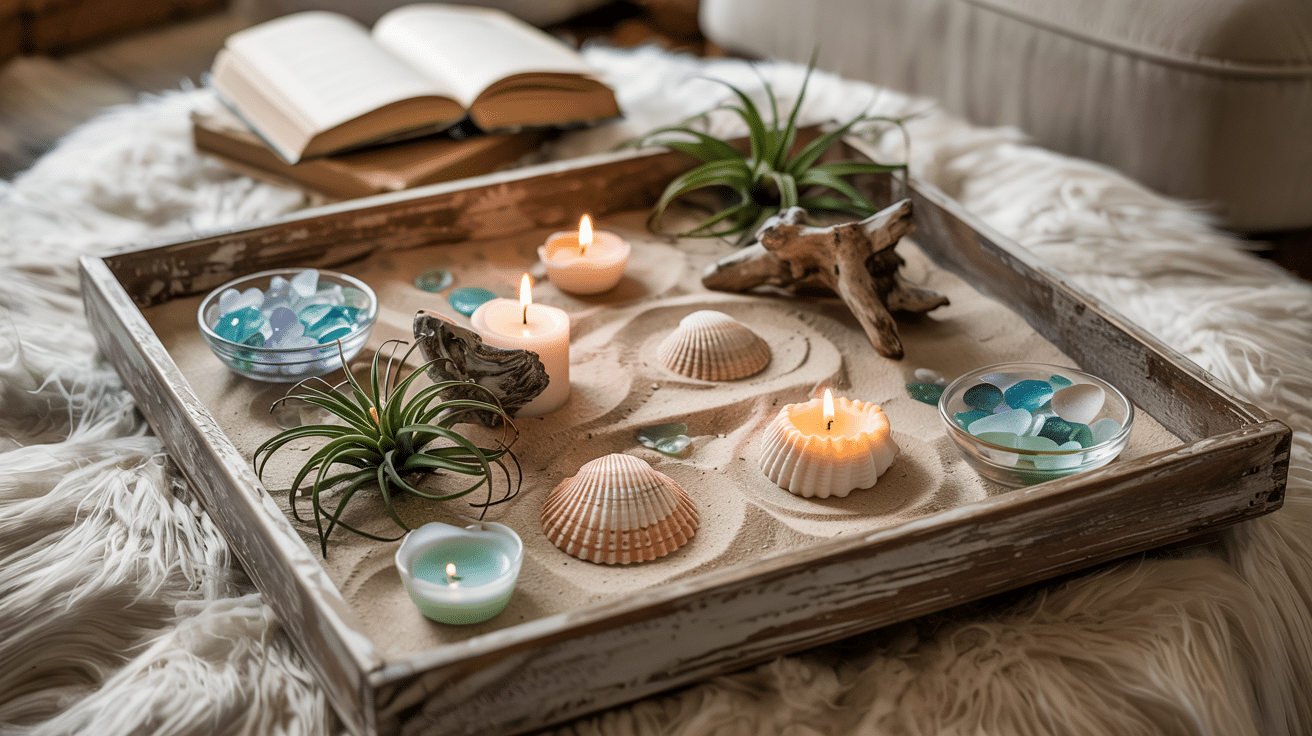
Gather several shell candles and other beach finds on a wooden or rattan tray. Add small piles of sand, smooth stones, and bits of sea glass around the candles.
This portable display can be moved from room to room as needed. When guests visit, put it on a coffee table, then move it to your dining table for dinner. The tray keeps everything neat while telling a visual story about days at the shore.
4. Accent Bathroom Shelves

Turn your daily routine into a spa-like break by adding shell candles to your bathroom. Line them up on open shelving or around the edge of your tub.
The gentle light bounces off tile and mirror surfaces, creating a soft glow perfect for a relaxing soak. The water theme of shells feels right at home in this space.
For safety, keep them on stable surfaces away from shower spray or towels.
5. Incorporate into a Table Centerpiece
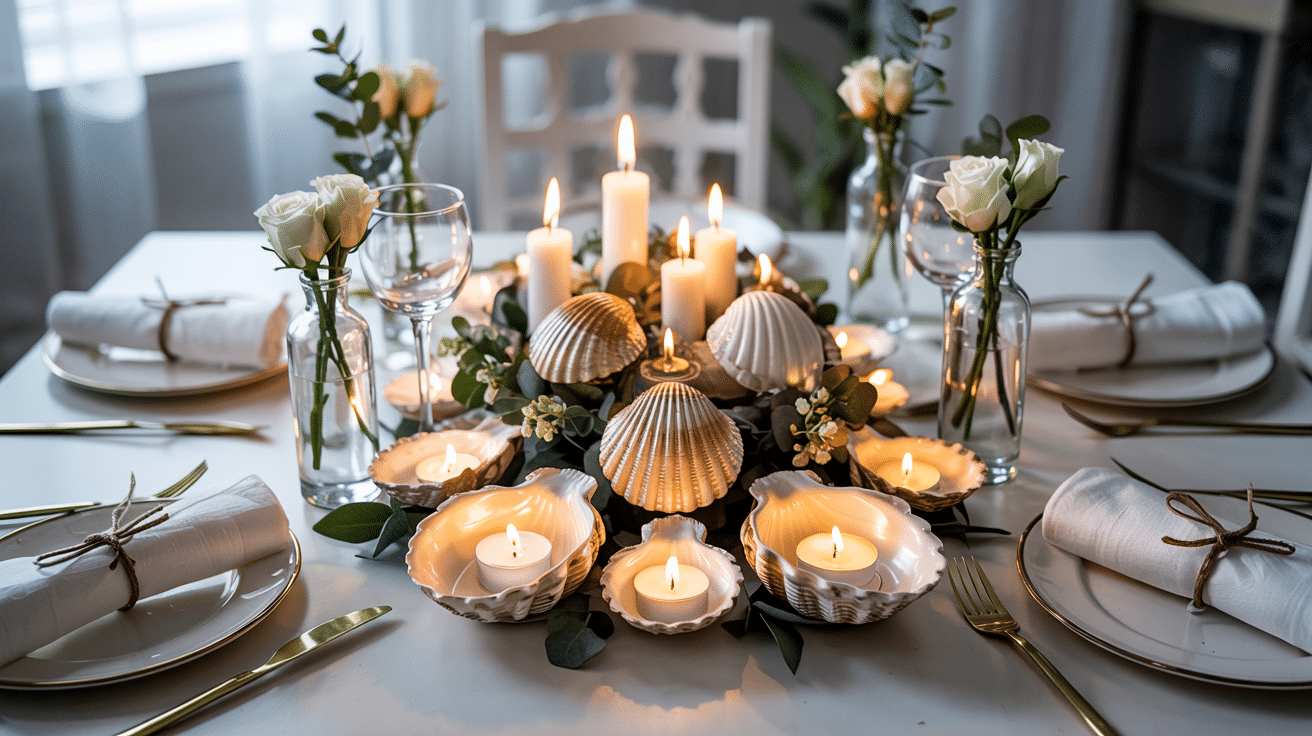
Mix shell candles with natural elements for a stunning table display. Try pairing them with small glass bottles filled with wildflowers or sprigs of greenery.
For a longer table, create a runner effect using a line of candles among twisted bits of driftwood. This works for both special occasions and everyday meals.
The natural texture mix of smooth shells, rough wood, and soft plant life creates a rich sensory experience for your table.
6. Adorn a Mantel or Bookshelf
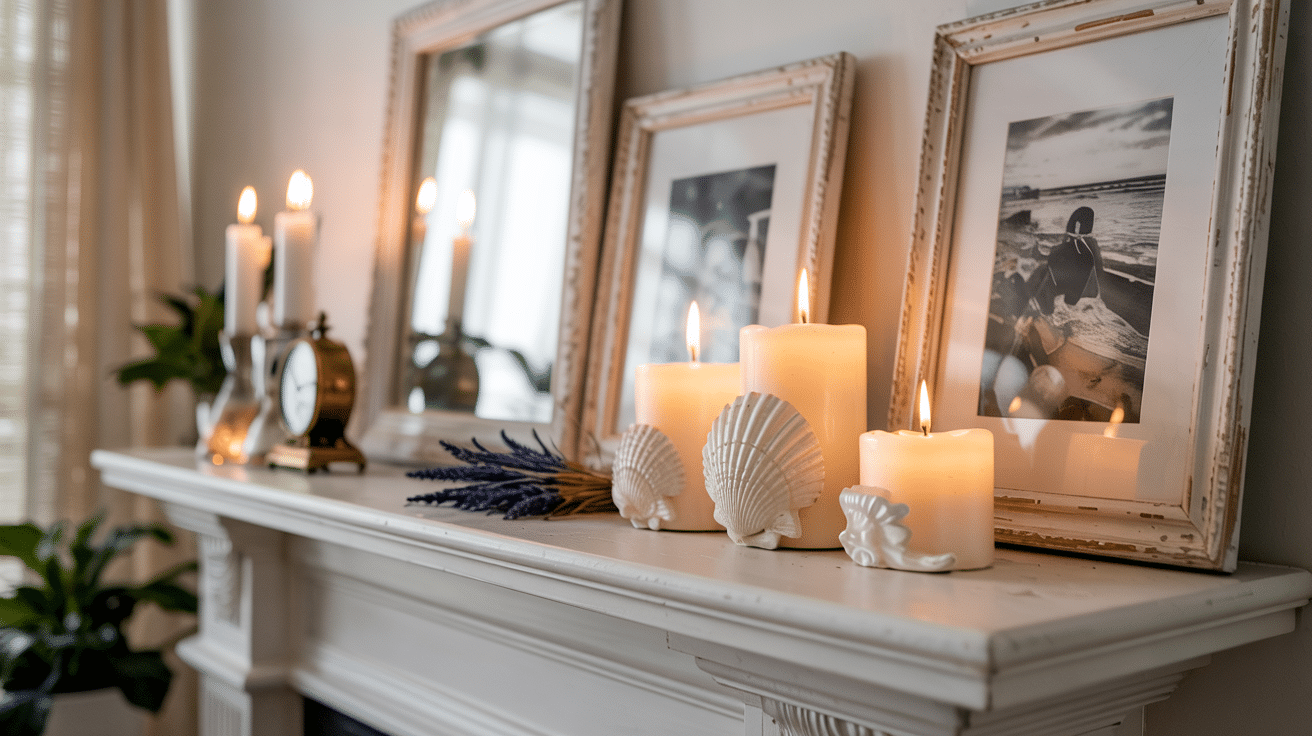
Spread shell candles along your mantel or bookshelf, mixing them with framed beach photos or small items from your travels.
Place some candles on small stands or books to create height variation. The mix of lit and unlit candles adds depth to your display. This type of arrangement lets you show off your shell candles even when you’re not burning them.
7. Use in Outdoor Entertaining Spaces
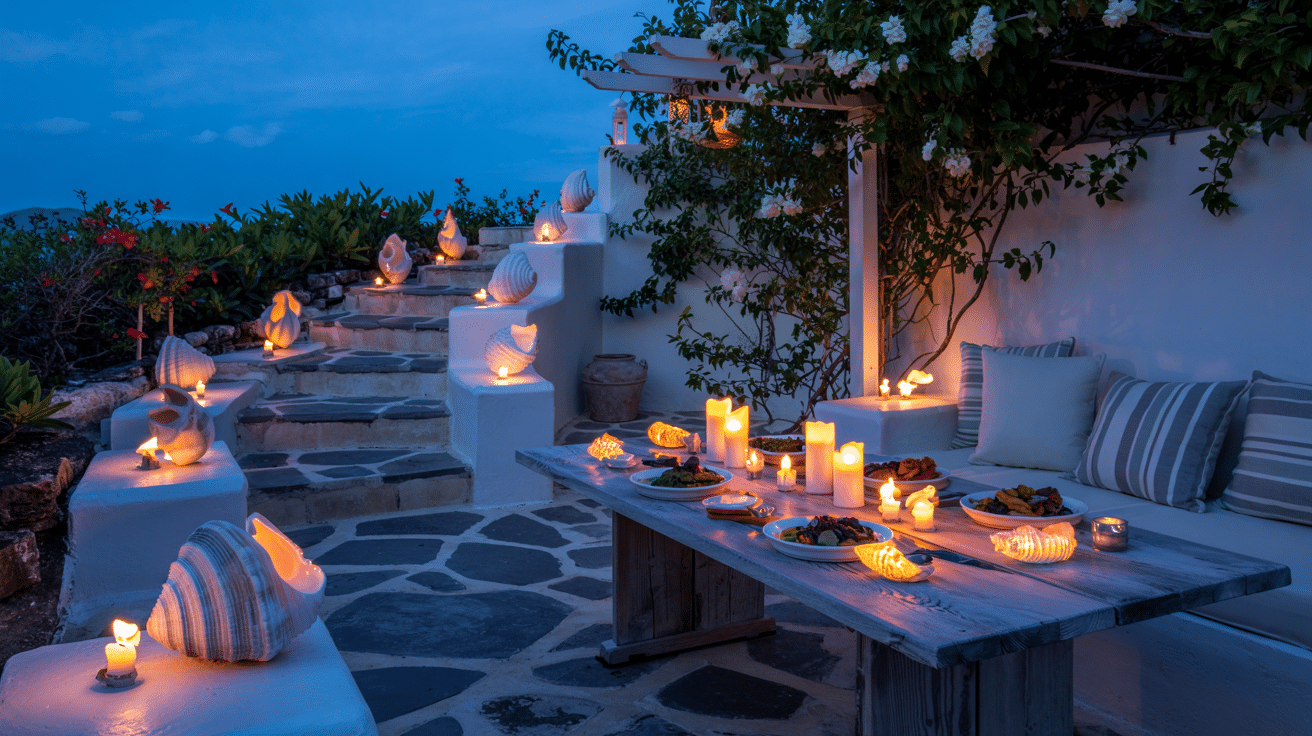
Shell candles placed around eating and sitting areas bring beach vibes to your outdoor gatherings. They cast just enough light for after-sunset chats on the patio.
Group them on steps, stone walls, or around the edges of a fire pit for a magical light ring.
8. Display on a Glass Cake Stand
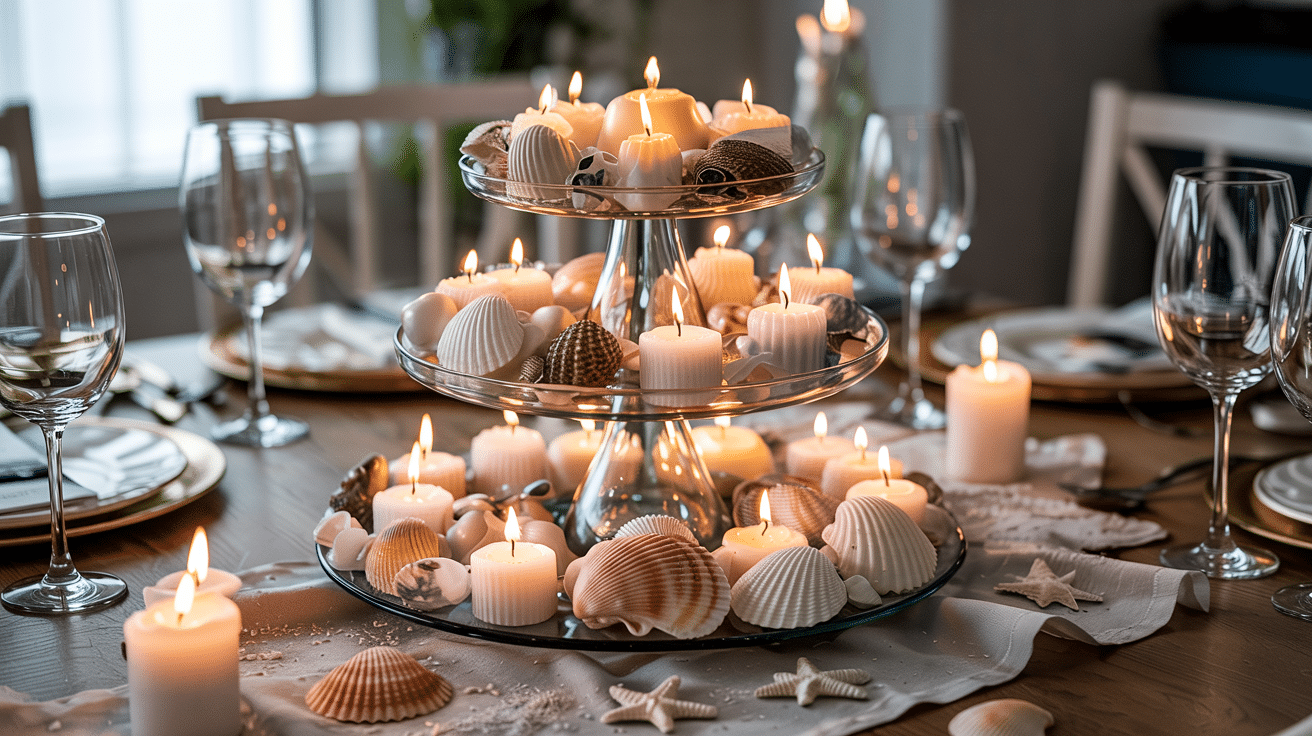
Put your shell candles on a clear glass cake stand to create a simple yet striking centerpiece. The height adds interest to your coffee or dining table. The glass base catches light and makes the candles seem to float.
For extra impact, add a thin layer of white sand under the candles. This creates a mini beach scene right on your table. When lit, the raised platform helps spread the warm glow across a wider area.
9. Pair with Indoor Plants
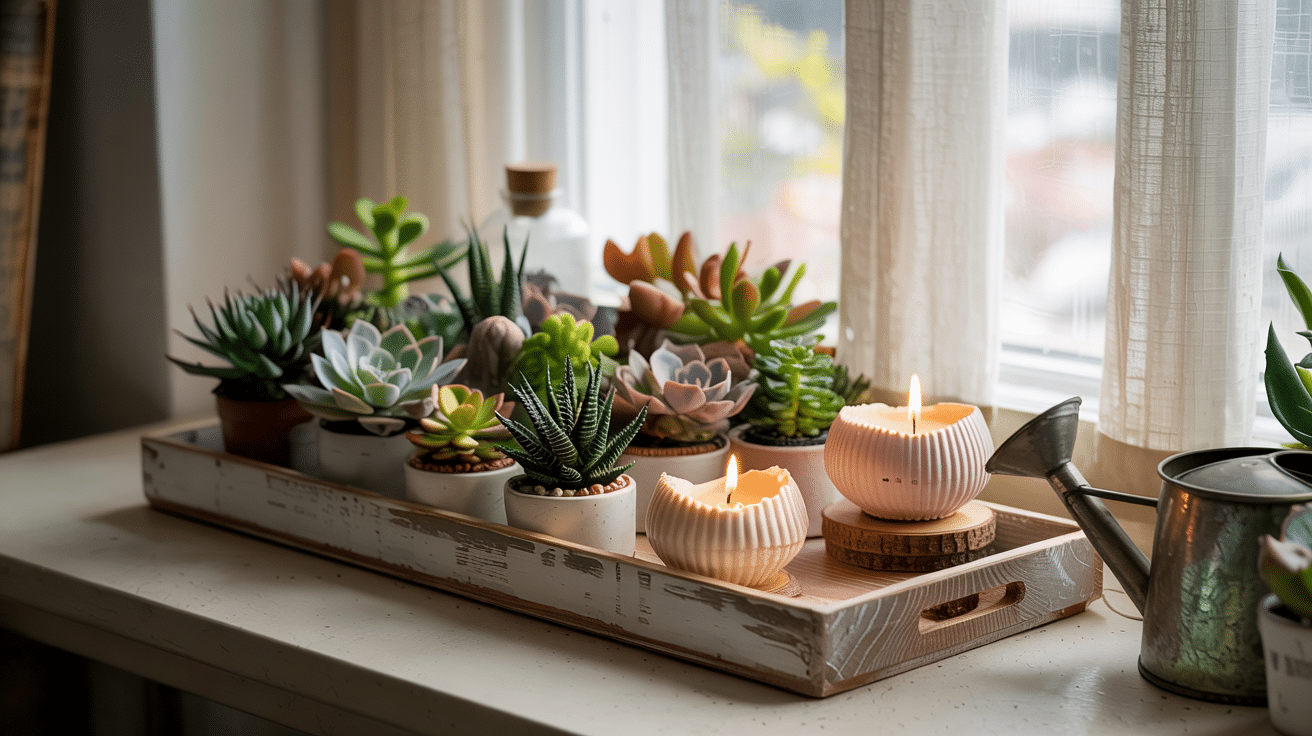
Set shell candles among your houseplants to create a natural scene. The green leaves and soil tones work well with the beach colors of your candles.
Try placing them among succulents in a wide, shallow pot. The contrast of solid plants and flickering flame creates visual interest in any room. This combo brings together fire, earth, and water elements for a balanced feel.
10. Feature on a Bedside Table
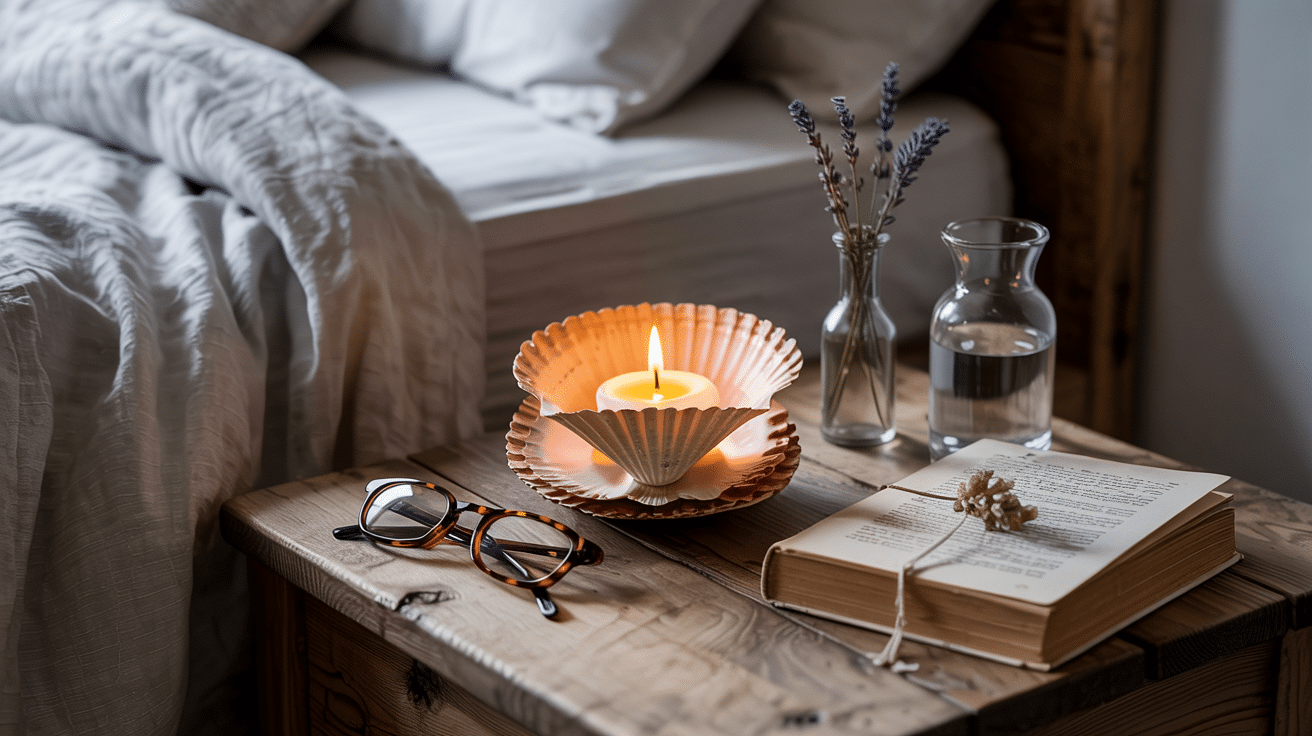
Place a single shell candle on your nightstand to end each day in a calming way. The soft light is perfect for winding down before sleep.
Keep a small dish of matches nearby for easy lighting. The gentle scent and low light help signal to your body that it’s time to rest.
This small touch turns your bedroom into a peaceful retreat with coastal charm.
11. Hang as Part of a Wall Sconce
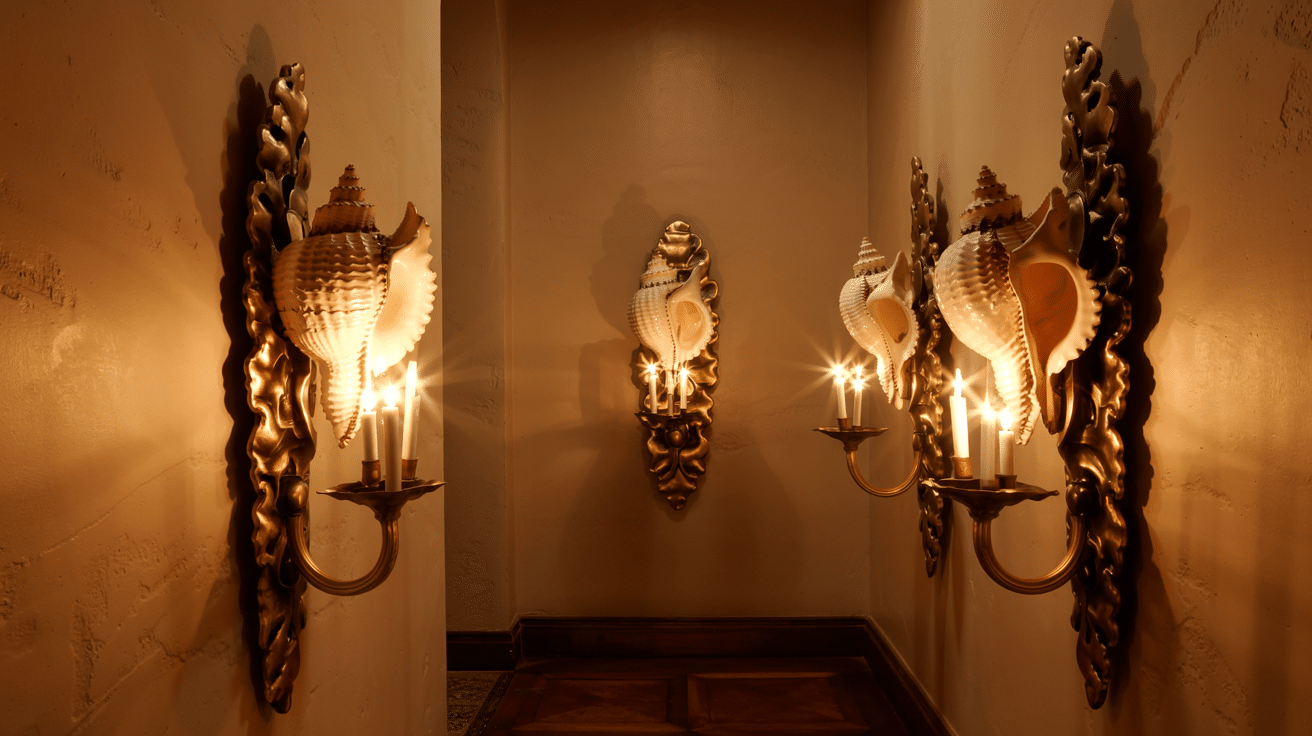
Mount larger shell candles in wall holders for an unexpected twist on traditional sconces. This works especially well in hallways or stairwells where table space is limited.
Use sturdy hardware that can support the weight of your shells. The wall placement keeps the gentle light at eye level, creating a warm glow as you walk through your home. This method turns your candles into functional fixtures that add character to plain walls.
Safety Tips: Burning and Caring for Seashell Candles
While seashell candles bring beauty to your home, safety must come first when using any flame-based decor. Taking a few simple steps will help you enjoy your coastal lights without worry.
- Never leave burning candles unattended, even for a short time.
- Place seashell candles on heat-resistant surfaces away from flammable items.
- Keep these candles out of reach of children and pets.
- Trim wicks to 1/4 inch before each lighting to prevent high flames.
- Stop burning when the wax gets low to avoid damage shell.
- Allow the candle to cool completely before handling or moving.
- Store seashell candles away from direct sunlight to prevent color fading.
- Clean shells gently with a soft cloth to remove dust.
Sustainable Crafting: Eco-Friendly Practices

With a few thoughtful steps, making seashell candles can be kind to our planet. By focusing on green methods, you can create beautiful items while reducing your impact on the earth.
- Collect shells during beach walks rather than buying commercial packs.
- Choose soy or beeswax instead of paraffin for a cleaner burn.
- Reuse old candle stubs by melting them down for new creations.
- Pick cotton wicks without metal cores for less waste.
- Use glass jars from your kitchen as candle bases.
- Select plant-based dyes or leave wax natural for fewer chemicals.
- Make sure shells are found, not taken from living creatures.
- Wrap finished candles in paper or fabric instead of plastic.
- Try solar melting methods on sunny days to save energy.
Wrapping It Up
Candles with seashells bring a touch of beach magic to your home with very little effort. These simple creations combine light, warmth, and natural elements in one small package.
I hope this guide helps you make and show off your coastal candles.
The steps are simple, and the results can fit any home style. From bathroom shelves to outdoor gatherings, these lights work everywhere. Remember to follow the safety tips when burning your candles. Keep an eye on them, place them on safe surfaces, and trim those wicks.
Ready to start creating?
Grab some shells from your last beach trip and put them to good use. Your home will thank you for the warm glow and coastal feel these little lights bring.