You know that awkward bathroom moment: the tile looks beautiful, the vanity is new, the faucet shines, and then the lighting makes everything feel flat, yellow, shadowy, or way too bright. That is why choosing bathroom lighting for different remodel styles is not just a “pick a pretty fixture” decision. It affects how your face looks in the mirror, how safe the shower feels, how relaxing the room is at night, and whether your remodel actually feels finished.
The useful answer is simple: match the lighting layers to the way the bathroom will be used, then choose fixture shapes that support the remodel style. A spa bathroom needs calm, soft layers. A modern bathroom needs clean, low-profile light. A farmhouse bathroom can handle warmer metal finishes and shaded sconces. A small powder room may need one hardworking decorative fixture plus a flattering mirror light. The style matters, but function comes first.
Key takeaway: great bathroom lighting usually combines three jobs: general light, face-level task light, and mood or accent light. The best remodels do not rely on one ceiling light to do everything.
1. Start with The Three Lighting Layers Before You Pick a Style
Before you decide whether your bathroom should look modern, coastal, classic, rustic, or hotel-like, decide what the light needs to do. Think of bathroom lighting like getting dressed in layers. One layer keeps you covered, one layer makes you comfortable, and one layer makes the outfit look intentional.
General lighting is the room’s basic brightness. This usually comes from ceiling fixtures, recessed lights, flush mounts, or a central fixture. It helps you walk in, clean, find towels, and see the whole room.
Task lighting is the focused light you need at the mirror. This is the most important layer for shaving, skincare, makeup, contacts, hair styling, or checking whether your face actually matches your neck before you leave the house. Side sconces, vertical mirror lights, or well-placed vanity bars do this job better than one overhead light because they reduce shadows under your eyes, nose, and chin.
Accent or mood lighting makes the bathroom feel designed. It might be a small LED strip under a floating vanity, a soft shower niche light, a dimmable pendant in a powder room, or a gentle night light. This layer is especially useful when you do not want to blast your eyes at 2 a.m.
The U.S. Department of Energy recommends reading the Lighting Facts label and choosing LED products by brightness, color, and intended location instead of relying on old wattage habits; you can use its LED lighting guide to understand efficiency and bulb labels. The ENERGY STAR light bulb guidance is also useful when you want bulbs that meet recognized efficiency and performance criteria.
|
Lighting layer |
Best bathroom use |
Common fixture choice |
Why it matters |
|---|---|---|---|
|
General light |
Walking, cleaning, shower access |
Ceiling light or recessed lights |
Prevents dark corners |
|
Task light |
Makeup, shaving, skincare |
Side sconces or vanity bar |
Reduces face shadows |
|
Accent light |
Relaxing, nighttime use, style |
LED strip, niche light, pendant |
Adds comfort and depth |
2. Use a Simple Brightness Formula so The Room Is Not Too Dim or Too Harsh
Many bathroom lighting mistakes happen because people buy fixtures by appearance only. A gorgeous fixture can still be too dim. A high-output fixture can make a small powder room feel like a hospital hallway. To avoid that, use lumens. Lumens measure brightness. Watts measure energy use. In everyday terms, lumens tell you how much light you get; watts tell you how much power the bulb uses.
Here is a simple planning formula:
Total Bathroom Lumens = Bathroom Square Feet × Target Lumens per Square Foot
For many everyday bathrooms, a practical starting range is about 50 to 80 lumens per square foot, then you adjust based on wall color, mirror size, ceiling height, and age-related visibility needs. A 60-square-foot hall bathroom may feel comfortable around 3,000 to 4,800 total lumens spread across ceiling and vanity fixtures. A dark green bathroom with matte tile may need more than a white bathroom with glossy tile because darker surfaces absorb more light.
Example: if your bathroom is 8 feet by 10 feet, it is 80 square feet. At 60 lumens per square foot, your starting target is:
80 × 60 = 4,800 Total Lumens
Do not put all 4,800 lumens in one ceiling light. That creates glare and shadows. Instead, split it. You might use 2,000 to 2,500 lumens from ceiling lights, 1,500 to 2,000 lumens around the vanity, and a smaller dimmable accent source for mood. This feels more natural because the light comes from more than one direction.
The Wikipedia page on lumens is useful for a quick definition of the measurement, while the U.S. Department of Energy lighting choices guide explains how efficient lighting choices can reduce energy use at home.
3. Choose Color Temperature Based on The Remodel Mood
Color temperature is the “warm or cool” feeling of light. It is measured in Kelvin, often written as K. Lower numbers look warmer and more golden. Higher numbers look cooler and bluer. This matters a lot in a bathroom because light color changes how tile, paint, wood, stone, and skin tones appear.
For most homes, 2700K to 3000K feels warm, soft, and flattering. It works well for traditional, farmhouse, vintage, rustic, Mediterranean, and cozy spa bathrooms. 3000K to 3500K gives a clean neutral look that suits modern, transitional, Scandinavian, and hotel-style bathrooms. 4000K can work for very crisp contemporary spaces, laundry-bath combinations, or bathrooms where bright grooming accuracy matters, but it can feel cold if the finishes are already gray, white, and shiny.
Key takeaway: the cooler your materials already are, the more carefully you should test the bulb temperature. A 4000K bulb over blue-gray tile can look icy. A 2700K bulb beside beige travertine can feel cozy. The same bulb can look different in different remodel styles.
|
Remodel style |
Helpful color temperature |
Fixture feel |
Best everyday result |
|---|---|---|---|
|
Spa |
2700K-3000K |
Soft, hidden, dimmable |
Relaxing at night |
|
Modern |
3000K-3500K |
Clean, slim, simple |
Bright but calm |
|
Farmhouse |
2700K-3000K |
Warm metal, glass shades |
Cozy and familiar |
|
Coastal |
3000K |
Light finishes, airy glass |
Fresh without glare |
|
Classic |
2700K-3000K |
Balanced, symmetrical |
Flattering and timeless |
4. Match Fixtures to Bathroom Remodel Styles without Losing Function
Now comes the fun part: style. The trick is to choose fixtures that look right and still put light where you need it. A bathroom fixture is not just jewelry. It is jewelry with a job.
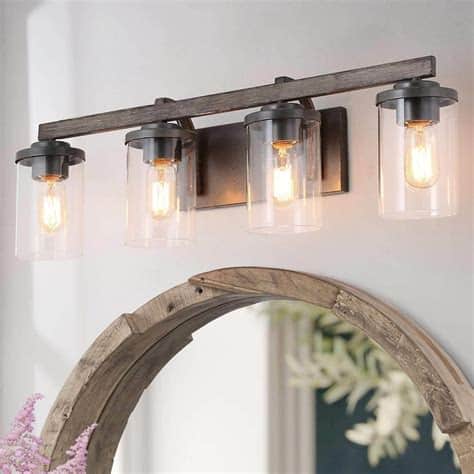
Modern Bathroom Remodels: Keep It Slim, Clean, and Controlled
Modern bathrooms usually use simple lines, flat panels, floating vanities, large tiles, frameless glass, and quiet finishes. The lighting should feel just as clean. Choose slim LED bars, simple cylinder sconces, small recessed ceiling lights, or backlit mirrors. Avoid bulky shades that interrupt the clean look.
For a modern remodel, place the vanity light at face level whenever possible. If you use a backlit mirror, remember that it may create a beautiful glow but may not provide enough direct task light by itself. Add side lighting or a high-quality front-facing mirror light if you do detailed grooming.
Everyday scenario: you have a 48-inch floating vanity, a frameless shower, and matte white tile. A wide backlit mirror looks sleek, but your face still seems shadowy when shaving. The fix is not a brighter ceiling light. Add slim vertical lights on both sides of the mirror or choose a mirror with integrated forward-facing lighting. The result feels modern and works better.
Spa Bathroom Remodels: Make the Light Feel Like a Deep Breath
A spa bathroom should not feel like a showroom. It should feel like an exhale. Use soft general lighting, dimmers, hidden LED strips, shower niche lights, and warm white bulbs. Choose fixtures with frosted glass or diffused covers so the light spreads gently.
For this style, dimming is essential. Bright light helps with cleaning and morning routines, but low light helps you relax in the bath or wind down before bed. A dimmer lets one bathroom serve both moods.
Common mistake story: someone remodels with stone-look tile, a soaking tub, and brushed brass fixtures, then installs one bright daylight ceiling panel. The room is technically visible, but it feels tense. Why? The light fights the spa goal. A warmer dimmable ceiling fixture, low-level vanity lighting, and a soft tub-area accent would support the calm feeling much better.
Farmhouse Bathroom Remodels: Use Warmth, but Avoid Yellow Shadows
Farmhouse bathrooms often include painted vanities, shaker cabinets, wood accents, black or bronze hardware, beadboard, framed mirrors, and classic glass shades. Warm light works beautifully here, but too-warm bulbs can make white walls look cream and can distort makeup colors.
Choose 2700K or 3000K bulbs with good color quality. Use clear or seeded glass shades only if the bulb itself is attractive and not painfully bright. If the glass is clear, choose a lower-glare bulb or a frosted bulb. Your eyes will thank you.
Everyday scenario: you love a three-light vanity fixture with clear glass jars. It looks perfect online. At home, the exposed bulbs glare in the mirror every morning. The easy fix is to use frosted globe bulbs and add a dimmer. You keep the farmhouse style but make it easier to live with.
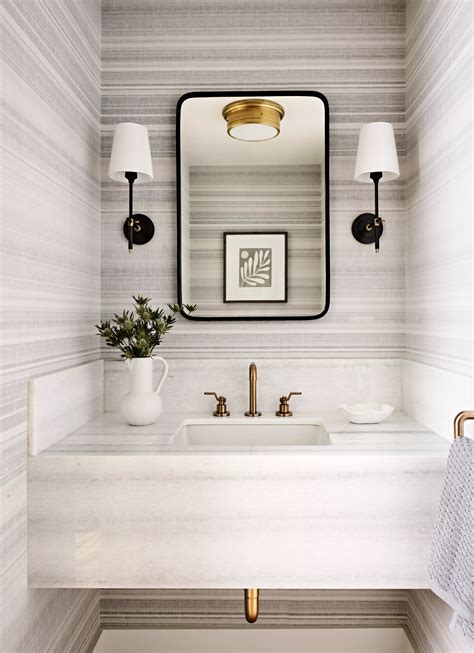
Classic and Traditional Bathroom Remodels: Symmetry Is Your Friend
Traditional bathrooms look best when the lighting feels balanced. Think paired sconces, polished nickel, warm brass, opal glass, shaded fixtures, and centered mirror lighting. Symmetry makes the room feel calm and finished.
For a classic double vanity, use one sconce on each outer side and one between the two mirrors, or use two matched vanity bars above separate mirrors. The goal is even face lighting. If you only use ceiling cans, the room may look expensive but still feel unflattering.
Key takeaway: traditional style rewards proportion. A tiny sconce beside a huge framed mirror looks accidental. A huge fixture over a small powder room vanity feels heavy. Measure first.
Coastal Bathroom Remodels: Bright, Airy, Not Blinding
Coastal bathrooms often use white walls, pale blue or green tile, sandy neutrals, woven textures, polished nickel, chrome, or light wood. They need brightness, but not glare. Choose soft white or neutral white lighting, diffused glass, and simple fixtures that feel breezy rather than heavy.
If your coastal bathroom has glossy tile, be careful with exposed bulbs. Glossy surfaces bounce light around, which can create sparkle in a nice way or glare in an annoying way. Frosted glass, shaded sconces, or indirect lighting usually feels better.
Industrial Bathroom Remodels: Balance Drama with Skin-Friendly Light
Industrial bathrooms use black metal, concrete-look tile, exposed pipes, brick, dark grout, and bold fixtures. The danger is that the room can become too dark or too harsh. A dramatic cage light may look cool, but it can throw striped shadows across your face.
Use industrial style in the fixture finish, not necessarily in the light pattern. Matte black sconces with opal glass can look industrial and still provide soft light. If you use Edison-style bulbs, keep them decorative and add stronger task lighting somewhere else.
Small Powder Room Remodels: Let One Fixture Work Hard
A powder room has fewer tasks. You are not usually shaving, showering, or doing a full skincare routine there. That means you can be more decorative. A wall sconce pair, a dramatic pendant, or a stylish vanity light can become the focal point.
Still, guests need to see themselves comfortably. Avoid placing a single bare bulb directly above the mirror unless the shade diffuses the light. In a tiny room, glare feels stronger because the walls are close.
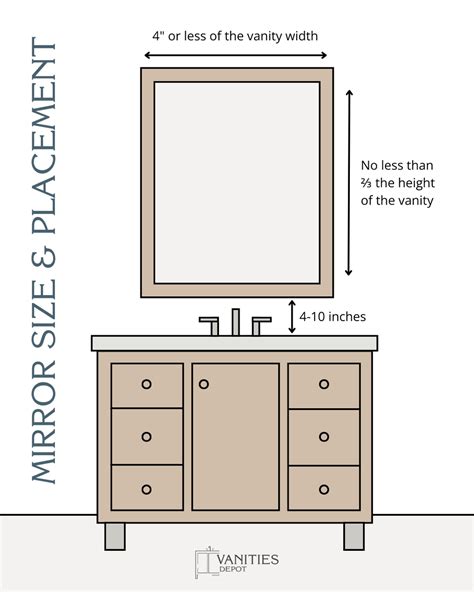
5. Put Vanity Lighting Where It Helps Your Face, Not Just the Mirror
One of the biggest bathroom lighting confusions is this: “Should the light go above the mirror or beside it?” The best answer depends on space, mirror shape, and your routine. But if you have room, side lighting is usually more flattering because it lights both sides of your face more evenly.
For many bathrooms, place side sconces around eye level, roughly 60 to 66 inches from the floor to the center of the fixture. Keep them reasonably close to the mirror so they light your face, not just the wall. Above-mirror lights can also work, especially in smaller bathrooms, but choose a fixture that spreads light down and out rather than creating a hard spotlight on your forehead.
Here is the second practical formula:
Mirror Light Width = About 65% to 85% of Mirror Width
Example: if your mirror is 36 inches wide, a vanity bar around 24 to 30 inches wide usually looks balanced. For a 48-inch mirror, a 32 to 40-inch vanity light often feels proportional. This is not a strict law, but it prevents the common mistake of putting a tiny 18-inch light above a large mirror and wondering why the whole vanity feels unfinished.
The National Kitchen & Bath Association planning guidelines are a helpful resource for understanding bathroom planning principles, clearances, and remodel layout decisions. For safety-related electrical rules, the National Fire Protection Association electrical safety page gives homeowner-friendly reminders about safe electrical practices around the home.
6. Choose Damp-Rated or Wet-Rated Fixtures in The Right Places
Bathrooms are humid. Steam, splashes, and water exposure matter. This is where style has to obey safety. A fixture that is fine in a hallway may not be right above a shower or close to a tub.
In simple terms, damp-rated fixtures are made for moisture in the air but not direct water contact. They are commonly used around vanities and general bathroom ceilings, depending on placement. Wet-rated fixtures are built for areas where water may directly hit or collect on the fixture, such as certain shower locations or exposed outdoor areas.
Do not guess here. Check the fixture label and local code requirements. If the fixture will be near a tub, shower, or other wet zone, ask a licensed electrician or inspector what rating is required in your area. It is much cheaper to ask before installation than to replace a beautiful but unsuitable fixture later.
Common mistake story: you find a gorgeous pendant and hang it near the tub because it looks like a boutique hotel. Then the electrician tells you it cannot stay there because of clearance and wet-location concerns. The problem is not taste; the problem is placement. Choose bathroom-safe fixtures first, then choose the prettiest option within that safe category.
7. Compare Practical Choices by Remodel Goal
Different remodel styles create different daily problems. A modern bathroom can feel cold. A vintage bathroom can feel dim. A spa bathroom can lack task light. A dark industrial bathroom can look dramatic but make grooming harder. Use the table below to match your style goal with the most useful lighting move.
|
Your remodel goal |
Fastest useful lighting move |
Typical weekly benefit |
Watch out for |
|---|---|---|---|
|
Better morning grooming |
Add side mirror lighting |
Fewer shadows every day |
Fixtures mounted too high |
|
More relaxing evenings |
Add dimmer or warm accent light |
Softer night routine |
One harsh ceiling light |
|
Small bath feels bigger |
Use mirror lighting plus bright walls |
Room feels more open |
Bulky dark shades |
|
Luxury hotel feel |
Layer ceiling, vanity, and accent light |
More polished look |
No dimming control |
|
Energy-smart update |
Switch to quality LEDs |
Lower energy use |
Ignoring color temperature |
Real-Life Bathroom Lighting Scenarios You Can Copy
Scenario 1: You Have a Tiny 5-By-8 Hall Bathroom
You need the room to feel bigger, brighter, and less cramped. Use a low-profile ceiling light or two small recessed lights for general brightness. Add a vanity light that is almost as wide as the mirror, or use two narrow sconces if wall space allows. Keep the color temperature around 3000K for a clean but not icy look.
Avoid heavy fixtures, dark shades, and one tiny ceiling light. In a small bathroom, shadows make the room feel even smaller. Light the mirror well, and the reflection helps bounce brightness around the space.
Scenario 2: You Are Creating a Calm Primary Bathroom
You want the bathroom to feel peaceful after work but still useful in the morning. Use layered light: recessed ceiling lights on a dimmer, side sconces at the vanity, and a soft accent light near the tub, niche, or floating vanity. Choose 2700K or 3000K depending on your finishes.
If you have natural stone, warm wood, or beige tile, 2700K can feel cozy. If you have white oak, marble-look porcelain, or pale gray tile, 3000K often keeps things fresh. Add dimmers so the room can shift from “wake up” to “wind down.”
Scenario 3: You Are Remodeling for Aging Eyes or Shared Family Use
As people get older, they often need more light to see comfortably. Kids and guests also benefit from clear, even lighting. Use brighter general lighting, good face-level vanity lighting, and a low-level night light. Avoid glossy glare and exposed bulbs.
Success indicator: everyone can use the bathroom at night without turning on a blinding overhead light, and morning routines feel clear without squinting. That is practical comfort, not just design.
Scenario 4: You Want a Statement Powder Room
Powder rooms are great places for personality. You can use a sculptural sconce, a small pendant, or a decorative mirror-light combination. Because the room is small, choose one focal point. If the wallpaper is bold, keep the light shape simpler. If the walls are quiet, the fixture can be more dramatic.
Just remember: decorative does not mean dim. Guests still need enough mirror light to wash hands, check their hair, or reapply lipstick before returning to dinner.
Three Common Bathroom Lighting Mistakes and How to Avoid Them
Mistake 1: Using only One Ceiling Light
This is the classic problem. One ceiling light may brighten the floor, but it often throws shadows on your face. You lean closer to the mirror, turn your head, and still cannot see clearly. The fix is to add task lighting at the vanity. Even a simple side-sconce pair can make the bathroom feel more expensive and easier to use.
Mistake 2: Choosing Bulbs that Fight the Finishes
A bulb can change the entire mood of your remodel. Warm bulbs can make cool tile look muddy. Cool bulbs can make warm wood look gray. Buy one bulb or one fixture sample first when possible. Test it in the bathroom at morning, afternoon, and night. This small step can save you from living with a color you dislike.
Mistake 3: Forgetting Dimmers until It Is Too Late
Bathrooms have different moods at different times. Morning light should help you wake up. Evening light should calm you down. Cleaning light should be bright. Night light should be gentle. A dimmer gives one fixture more flexibility. Before buying, make sure the bulb, fixture, and dimmer are compatible.
How to Shop for Bathroom Lighting without Getting Overwhelmed
Start with measurements. Measure the vanity width, mirror width, ceiling height, and distance from mirror edge to nearby walls or cabinets. Take photos of the bathroom in daylight and at night. Then choose the fixture type before choosing the finish.
For tools, you do not need anything fancy. Use a tape measure, your phone camera, painter’s tape, and the product specification sheet from the retailer. Put painter’s tape on the wall where a sconce or vanity bar would go. Stand back. Does it look too high, too low, too wide, or too small? This simple mockup catches mistakes before holes are drilled.
When shopping online, look for these details: lumen output, color temperature, CRI or color quality information, damp or wet rating, dimmer compatibility, fixture dimensions, shade material, and installation requirements. If those details are missing, choose another product or contact the seller.
The Consumer Reports light bulb guide can help everyday shoppers compare bulb types and buying considerations. The U.S. Energy Information Administration home energy page is useful if you want broader context on household energy use and why efficient fixtures matter over time.
Quick Style-By-Style Recommendations
If your bathroom is modern: choose slim linear lights, backlit mirrors with added task support, recessed ceiling lights, and simple black, chrome, or brushed nickel finishes. Keep shapes quiet and precise.
If your bathroom is spa-inspired: choose dimmable warm lighting, frosted glass, hidden LED strips, and low-glare ceiling lights. The goal is calm, not maximum brightness all the time.
If your bathroom is farmhouse: choose warm metals, simple glass shades, classic vanity bars, and 2700K to 3000K bulbs. Use frosted bulbs if clear shades create glare.
If your bathroom is classic: choose symmetrical sconces, polished nickel or brass, opal glass, and proportionate mirror lighting. Keep the layout balanced.
If your bathroom is coastal: choose airy glass, chrome or brushed nickel, soft white to neutral white bulbs, and diffused light. Avoid harsh glare against glossy tile.
If your bathroom is industrial: choose matte black or aged metal finishes, but soften the light with opal glass or shaded bulbs. Do not let dramatic cages create annoying face shadows.
If your bathroom is tiny: choose compact fixtures, bright but soft light, mirror-friendly placement, and minimal visual clutter. Let the mirror and walls help bounce light.
A Simple Step-By-Step Plan You Can Use This Weekend
Step 1: Write down your remodel style. Use plain words: modern, warm, spa, vintage, coastal, farmhouse, dramatic, or simple. This keeps you from buying a random fixture just because it looks nice in someone else’s bathroom.
Step 2: List your daily tasks. Do you shave? Apply makeup? Bathe kids? Clean often? Use the bathroom at night? Share it with guests? Your tasks decide the lighting layers.
Step 3: Calculate a rough lumen target. Multiply square feet by 50 to 80 lumens. Then spread that brightness across ceiling and vanity fixtures instead of relying on one source.
Step 4: Pick a color temperature. Use 2700K to 3000K for warm and cozy styles. Use 3000K to 3500K for crisp modern or transitional styles. Test before buying many bulbs.
Step 5: Choose safe fixture ratings. Check whether each fixture is suitable for damp or wet bathroom conditions. Ask an electrician for wet-zone placement near tubs and showers.
Step 6: Mock up the size. Use painter’s tape on the wall. A fixture that looks perfect in a product photo may look tiny above your actual mirror.
Step 7: Add control. Use dimmers where practical. A bathroom with dimming feels more custom because it adapts to morning, evening, cleaning, and nighttime use.
Final Takeaway: Choose Bathroom Lighting by Style, but Judge It by Daily Life
So, how do you choose bathroom lighting for different remodel styles? You start with how the bathroom needs to work, then you shape the look around your style. Modern bathrooms need clean, controlled lighting. Spa bathrooms need warmth and dimming. Farmhouse bathrooms need cozy fixtures without glare. Classic bathrooms need balance. Coastal bathrooms need bright softness. Industrial bathrooms need drama that still flatters your face. Small powder rooms need one confident fixture that does not forget function.
The smartest bathroom lighting plan is not the most complicated one. It is the one that lets you see clearly in the morning, relax at night, move safely after a shower, and enjoy the style you paid for. If you get the layers, brightness, color temperature, placement, and safety rating right, the whole remodel feels more intentional. Better yet, it feels easier to live with every single day.
Your next move: measure your mirror, choose your style word, calculate your rough lumen target, and test one bulb temperature before you commit. That small test can prevent the most common bathroom lighting regrets.