Paint that looks perfect one week can crack and flake off glass the next. This often happens because glass has no texture for paint to hold onto, unlike wood or fabric.
A few simple prep steps before painting can change that completely. Learning how to paint glass starts with cleaning the surface well and picking paint made for glass.
Thin, even coats and enough drying time make the finish last much longer. The right brush also plays a bigger role than you might think.
Can You Paint Glass?
Yes, you can paint glass, but the finish only lasts if you handle the basics first. Glass is smooth and has no pores, so paint has nothing to grip right away.
Skip the cleaning step, and a plain coat can chip within a few days.
Durability depends as much on paint type as on design. Enamel and specialty glass paints hold up far longer than paint straight off a canvas shelf.
The tools you use and the thickness of each coat matter almost as much. A jar painted in one thin, even layer will outlast one drowned in a single thick coat.
Which Glass Surfaces Can Be Painted
Not every glass surface takes paint the same way. Some need heavy prep work first; others need little at all. A quick check of the surface type before buying paint saves a wasted trip back to the store.
Smooth Glass Surfaces: Drinking glasses, plates, jars, and bottles are the easiest place to start with how to paint glass. Clean and degrease the surface first, and the paint will hold evenly.
Textured Glass Surfaces: Ridges and raised patterns on vases and decorative glassware cause paint to pool unevenly when applied thick. A lighter touch with thin coats prevents that.
Clear Glass Surfaces: Light passes through windows, panels, mirrors, and frames from both directions, so a color that looks solid from one side can look washed out from the other. Testing a small patch against a window first catches that problem early.
Frosted Glass Surfaces: Frosted vases and panels already carry a faint texture from how they’re made. That texture gives paint something to grip, so you need less sanding beforehand, though cleaning still matters.
Previously Painted Glass Surfaces: Old paint must come off before you apply new paint, whether by scraping or light sanding. Anything peeling underneath pulls the fresh coat down with it, no matter how carefully you apply it.
Gather Essential Glass Painting Supplies
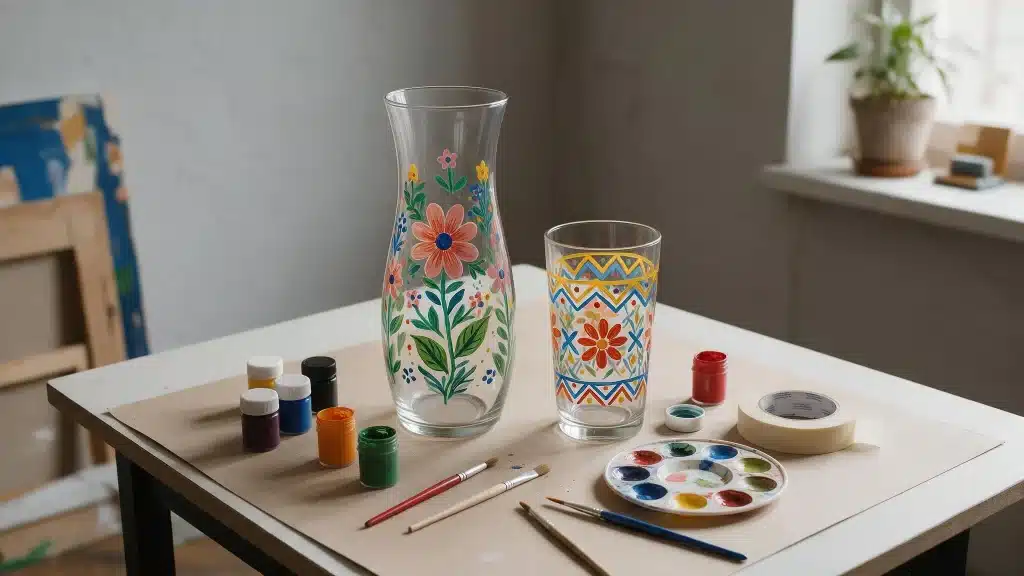
A basic supply list covers most glass painting projects, from jars to window panes.
Rubbing alcohol matters more than you might think, since it strips the oily residue plain soap and water leave behind, and a mixing tray with separate wells keeps colors from blending into mud.
- Glass cleaner or rubbing alcohol cuts through the oil and fingerprints that soap and water alone tend to miss
- A paint palette and mixing tray keep each color in its own well so blending stays controlled.
- Masking tape and stencils handle the parts a steady hand can’t manage, like straight edges and repeated shapes.
- Sponges and foam dabbers bring in texture no brush replicates, especially for mottled backgrounds.
- Paint markers and outliners take over where a brush gets clumsy, mainly for fine lines, lettering, and stained-glass-style outlines.
- Sealer is only necessary for paint that stays soft or tacky after it dries.
How to Paint Glass Successfully?
Six steps get you from bare glass to something that holds up to an actual dishwasher cycle. Skip the cleaning step and everything you do after that is wasted effort, paint included.
Step 1: Clean and Degrease the Glass

Start with plain soap and warm water, nothing fancy. Rinse it well and let it air dry on its own; a towel leaves lint stuck to the surface. That still isn’t enough, though.
Soap leaves behind an oily film you can’t see, so wipe it down again with rubbing alcohol or white vinegar on a lint-free cloth.
From here on, hold the glass by the edges. Your fingerprints put the oil right back.
Step 2: Prepare Your Glass Design

Tape your printed design underneath the glass so it’s visible through the surface. Test colors on a scrap piece first, since mismatched shades are annoying to fix mid-project.
Pick a simpler design if this is your first attempt, one with open space instead of tiny, cramped details.
Step 3: Mask Areas for Painting

A steady hand only gets you so far. Tape and stencils do the rest, holding lines straight where your fingers can’t.
Press a finger along the tape edge to seal it down fully, since any gap becomes a spot where paint sneaks under. If you pull the tape too early, it will take your paint with it.
Step 4: Apply and Build the Paint

Go light on the first coat. Load your brush, wipe off the excess, and pull it in one direction instead of scrubbing back and forth.
Heavy coats look convincing while wet, then reveal every brush stroke once dry. Two or three thin layers, each fully dry before the next, look better than a single thick pass.
Step 5: Add Decorative Details

Wait for your base coat to dry completely before adding outlines or small details with a fine brush or paint pen.
Rush this part, and you’ll smear wet color into fresh color, and there’s no fixing that once it happens.
Step 6: Dry and Cure the Paint

Read the label first, since some paints only need air-drying time while others want a short bake in the oven.
A piece meant for daily use, like a coffee mug, almost always calls for the oven-cure option over air-drying alone. Either way, this curing step is what actually locks the paint in place, not the drying itself.
A piece can look completely dry on the outside and still be soft underneath, so give it the full time the label asks for.
Sudden temperature swings cause most peeling, so avoid moving glass straight from a warm dishwasher to a cold fridge. Handles and rims wear fastest, so add extra sealer there.
Choose the Right Paint Type and Brushes
Paint type matters more for the final result than most other choices in this process. The wrong pick shows up fast, usually the first time the piece gets washed.
Water-Based Glass Paint
A wet paper towel and some soap fix a mistake before it dries. That forgiveness makes water-based paint the easier place to start on a first project.
Solvent-Based Glass Paint
This dries into a harder, scratch-resistant finish, but cleanup needs mineral spirits instead of soap and water. Pieces that get handled often, like drinking glasses, hold up better with it.
Acrylic Enamel Paint
Acrylic paint straight from the bottle behaves like ordinary craft paint. Bake it afterward, though, and it becomes dishwasher-safe, which is why painted mugs and plates rely on it.
Regular Acrylic Paint
Fine for anything mostly decorative and rarely handled, but skip the sealer at your own risk. Without one, it sits on the glass rather than bonding to it, and it shows.
Chalk Paint for Glass
Matte instead of glossy, and forgiving of whatever mess is already on the glass. Unlike other paint types, chalk paint can go over most existing grime or old paint without heavy scraping or sanding.
Glass Paint Pens
No brush required. Lettering and thin, controlled lines come out cleaner with a pen than they ever would freehand, and they’re handy for last-minute touch-ups too.
Brushes for Glass Painting
|
Brush Type |
Best For |
|---|---|
|
Soft Synthetic Flat Brushes |
Smooth, even coverage over larger areas |
|
Round Brushes |
Fine details and small accents |
|
Liner Brushes |
Thin, precise outlines |
|
Fan Brushes |
Blending colors and soft transitions |
|
Foam Brushes |
Streak-free base coats |
|
Stencil Brushes |
Dabbing paint through stencils cleanly |
A foam roller handles a full window pane faster than any brush, with a smoother finish to show for it.
Try Decorative Glass Painting Techniques
Reverse painting, stenciling, sponging, brush work, freehand, and frosting all produce a different look on the same piece of glass.
1. Reverse Painting for a Faux Stained Glass Effect

Paint goes on the back of clear glass here, working in reverse order from how a normal painting builds up.
Outlines go down first, close to the glass, and color fills in behind them. Looking through the front, you see the outline first and the color behind it; that layering is what produces the glow this method is known for.
Stained-glass-style pieces look best near a window with light passing through. Glass suction cups work well for hanging smaller pieces without any drilling.
2. Stenciling and Masking Tape for Clean Lines, Stripes, and Geometric Designs

Tape and stencils repeat the same shape across a whole piece, not just block off one section.
A vase covered in even stripes or a jar wrapped in a geometric pattern both start from this same move. Getting the spacing right before any paint touches the glass makes a bigger difference than expected.
3. Sponge and Dot Painting for Soft Texture and Pattern

Dab a sponge lightly onto wet paint, and it leaves behind texture a brush can’t produce. Dip the rounded end of a paintbrush handle in paint instead; it makes fast, even dots.
These work well for polka-dot patterns or small floral accents. Mixing dot sizes within one piece keeps the pattern from looking too uniform.
4. Brush Painting for Smooth, Opaque Coverage

This one is about full, solid color with no gaps or streaks. It works as a base layer under other techniques, or on its own for something meant to stay one flat color. Two thin coats instead of one thick coat leave fewer brush marks.
5. Freehand Painting for Custom Designs

No stencil, no traced pattern, just a fine brush or paint pen moving across the glass. The design shifts mid-project instead of locking in from the first stroke, since nothing is measured out in advance.
That flexibility suits a one-of-a-kind piece that isn’t trying to match anything else.
6. Frosted Finish Technique

Etching cream or a frosted glass spray both fake the sandblasted look without any actual sanding. Clear glass surfaces benefit most, especially where some added privacy or texture is the goal.
Heavier spray coats tend to drip, so a light, even pass works better here.
Getting Glass Painting Right
Glass takes paint well once you’ve done the groundwork. Start with a clean surface, then choose paint suited to how you’ll use the piece.
Thin layers beat one heavy coat, and let it fully cure before use. A jar painted as faux stained glass and a window given a frosted finish both start from the same base.
Each one points in a different direction, depending on the look you want. Painting glass really comes down to that order, not any special skill.
Follow that order, and the paint holds up for years; skip a step and it won’t.
Frequently Asked Questions (FAQs)
1. Does Glass Need Primer Before Painting?
Not usually; glass paint is made to bond to a clean surface on its own.
2. Can Painted Glass Go in The Microwave?
Skip it; even microwave-safe glass can scorch or discolor wherever it’s painted.
3. Is Glass Paint Safe to Use Around Food?
Only if the label says it’s food-safe; otherwise, keep it off anything you eat or drink from.
4. Can Two Glass Paint Colors Be Mixed?
If they’re the same brand and type, they’ll blend without a problem.
5. How Long Does Glass Paint Take to Cure Fully?
Give it one to three weeks to air-dry, or about 30 minutes if it’s an oven-cure paint.