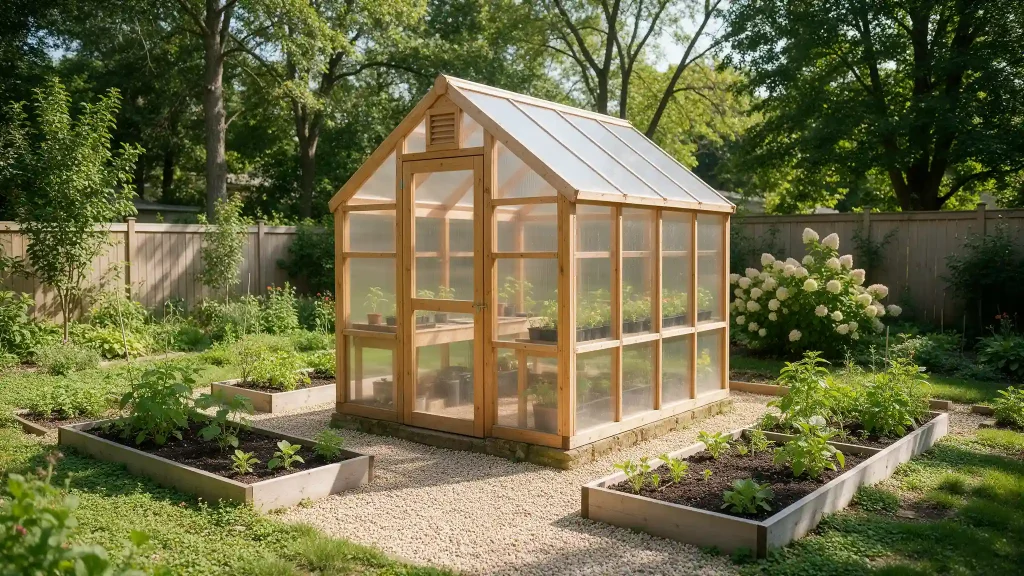
A DIY greenhouse can be as simple as plastic sheeting stretched over a row of hoops, or as sturdy as a wood-framed structure fitted with polycarbonate panels.
In either case, construction goes pretty much in the same order: choose an appropriate design for your budget and space, collect the necessary materials, assemble a rectangular frame on level ground, and add a cover, doors, and vents that work.
This guide walks through that sequence: planning, framing, covering, ventilating, and finishing, before covering budget-friendly plans and the mistakes that trip up first-timers.
It may seem difficult because of its complexity, but in reality, it is all about measuring and square corners.
What to Decide Before You Build a DIY Greenhouse
Before cutting any lumber, make a few choices that will make everything else fall into place. It depends on what you want to plant, which affects size, since seedling trays take up less space than fully grown tomatoes or peppers.
The place you choose for the garden bed is just as important; you should have at least six hours of sunlight per day and avoid flooded areas or places where the wind can get through from behind a fence.
Short checklist before starting:
- What you’re growing, and how much space it actually needs
- A site with strong sun exposure and reasonable wind protection
- Ground that drains instead of pooling water
- Whether your city or HOA requires a permit for a permanent structure
While a small hoop house won’t need a permit, a permanent one over a certain size will, and a five-minute phone call to the building department should be enough before you spend money on materials.
Choosing a Greenhouse Design that Fits Your Space
Not every backyard needs the same kind of framework, and choosing the one that suits your purpose will affect cost and the amount of carpentry work needed.
Consider the durability of the greenhouse you plan to build, how often you can maintain it, and whether you need a permanent or seasonal structure.
Wooden Frame Greenhouse

Most sturdy choice when building something permanent. It needs a bit of framing know-how along with either pressure-treated wood or cedar, but it will last many years and work just as well with glass, polycarbonate, or plastic sheeting.
Also leaves lots of room for future upgrades in terms of shelving, vents, and even electrical work if need be.
Price ranges from $500 to $3,000 and up.
PVC Hoop House

Inexpensive, quick and forgiving. PVC pipes shaped in an arc and bolted to the ground with greenhouse plastic wrapped around them. Great for a beginner or a temporary setup.
Also easily taken apart and moved, making it ideal for renters or people who don’t want a permanent structure in their backyard.
Cost is usually between $50-$300 for a backyard size.
Lean-To Greenhouse

Built against an existing wall or fence, which cuts material costs since one side is already there. Works well on tight lots.
A south-facing wall can also help hold warmth after sunset, although drainage and roof runoff need to be planned carefully before construction begins.
Cost typically runs $300 to $1,500 since one wall is already built.
Greenhouse From Old Windows

Window construction made from recycled materials. Requires more fittings and caulkings than a regular frame, but it does not cost much except for the hardware required.
Can turn out to be a unique construction, but each window must be inspected for any looseness and cracks.
Can cost anywhere between $100 and $500, depending mainly on the hardware and sealants, provided the windows are available.
Cold Frame

Not a walk-in structure at all, a low box with a hinged glass or plastic lid, sized for seedlings and hardening off plants. The simplest option if space is genuinely limited.
It can also extend the growing season by protecting young plants from light frost without the cost or footprint of a full greenhouse. Materials typically cost $30 to $150.
Materials and Tools for a DIY Greenhouse Build
After settling on the design, the materials you need are pretty much the same for each build.
You have to use materials that work well not only with your structure but also with your climate conditions, in case you plan to keep the greenhouse year-round.
Wind, rain, snow, and sun exposure may damage lightweight materials sooner than expected; thus, exterior fasteners and UV coverings are definitely worth considering.
Building materials:
- Pressure-treated or weather-resistant lumber (or PVC pipe, for a hoop build)
- Greenhouse plastic film or polycarbonate panels
- Exterior-rated screws and fasteners
- Door hinges and a latch
- Gravel or paving blocks for the foundation
- Anchors or ground stakes
- Vent hardware (hinges, screens, or an automatic opener)
Tools:
- Tape measure and a level
- Framing square
- Drill/driver and a saw
- Staple gun or the fastener appropriate to your covering
- Shovel, for grading and foundation work
- Safety glasses and gloves
Buy the covering last, once the frame dimensions are locked in; cutting panels or film to fit a frame that’s still shifting wastes material.
How to Build a DIY Greenhouse: Step by Step
This is the part most people actually came here for, so here’s the full sequence in order.
Work slowly through the foundation and framing stages, because small mistakes at the base tend to show up again at the roof, door, and covering.
Step 1: Measure and Mark the Footprint.

Set the four corners and measure the diagonals; when they’re the same length, then the setup is square.
Take the measurements one more time before you do any digging or attach anything to ensure that your entryway matches your design plans for the path inside.
Tighten the string between the stakes so that your sides are straight, and see if your measurements match up with your list of lumber lengths.
Step 2: Level and Clear the Ground

Take out any sod or other plant life, and make sure that the area is graded in such a way that water will flow away from the greenhouse structure instead of into it.
A 2 to 4-inch layer of crushed rock beneath the floor provides better drainage in damp areas, and waiting a day for the ground to stabilize before construction is a good idea.
Step 3: Build the Foundation

All of them will do the trick; a sill made of wood, a layer of gravel, or posts pounded into the ground. Gravel drains well, wood is easier to use, and posts fit slopes well.
Whatever you choose, make sure that it is properly fixed and that you relevel before continuing with framing.
The corner posts should be at least 2 feet into the ground in cold areas and made of pressure-treated wood.
Step 4: Assemble the Base Frame
Square and fix the perimeter first, everything else relies on this being correct.
Use only screws or bolts that are exterior-grade; check the angles of the corners with a framing square and ensure the diagonals are the same after tightening the fasteners.
Pre-drill holes at the corners to avoid splitting the wood, and use galvanized or stainless hardware so that the base can last outdoors for many years.
Step 5: Build the Side Walls

Use an appropriate number of studs depending on the coverings you want to use for the greenhouse; polycarbonate requires more support than film. The walls can be assembled on the ground and lifted into position when you are working on them.
The studs should not exceed 24 inches for polycarbonate and less distance for glass sheets.
Step 6: Build the Front and Back Walls
Frame in the rough openings for the door and any planned vents now, before the walls go up. Check the width and height against the actual door or vent hardware so you do not have to resize openings later.
Confirm the door swing has enough clearance on both sides, and add a little extra width if you plan to move wheelbarrows or large trays through it.
Step 7: Add the Roof Structure

Rafters or bent hoops with, perhaps, a ridge beam if required by the design along with diagonal bracing that would prevent the entire structure from racking in the wind.
The rafters should be evenly spaced and should match on both sides so that the roof would lie flat and level. Any vent cut for the ridge should be done now because it will be more difficult after installing the roof covering.
Step 8: Attach the Covering

Staple and batten the film on top of the furring strips to prevent tearing when fastening; fasten the polycarbonate through pre-drilled holes using rubber washers to prevent water from seeping inside.
Work from one end to the other, and keep the material straight to prevent folds or loose spots.
Ensure panels overlap by at least 2 inches, and apply a bead of caulk suitable for the covering around all seams.
Step 9: Hang the Door

Leave a little clearance for the frame to shift with temperature, and weatherstrip the gap once it’s hung. Test the door several times before tightening all the hardware, making sure it swings freely and closes without scraping the base.
Add a door sweep or threshold seal once it hangs correctly, so drafts and pests stay out at the base.
Step 10: Install Windows or Vents

Roof vents let hot air escape at the peak; side vents pull cooler air in low. Most small builds need both. Position them on opposite levels when possible to encourage natural airflow, and add insect screening if you want to keep pests out.
Size vents to roughly 20 percent of the floor area for adequate airflow, and mark which ones open manually versus automatically.
Step 11: Seal Every Gap
Check panel joints, fastener heads, and the base for anywhere wind-driven rain or drafts could get in. Use the sealant recommended for your covering material, especially around doors, vents, corners, and roof joints where leaks usually begin.
Run a hand along every seam on a sunny day to feel for warm air escaping, and recheck the seal again once the frame has settled for a few weeks.
Step 12: Set up the Interior

Add benches, shelving, a gravel or paver path, and a nearby water source so the greenhouse is comfortable to use. Leave enough aisle space to carry trays, watering cans, or tools without brushing against plants or damaging the walls.
Position shelving near the vents so air can move around the plants, and keep a small thermometer inside to track temperature swings through the day.
Choosing a Covering: Plastic, Polycarbonate, or Glass
The covering controls more than appearance. It affects heat retention, light levels, durability, maintenance, and how strong the frame needs to be.
The right choice depends on whether the greenhouse is seasonal or permanent, how much weather it must handle, and how much you want to spend upfront versus replacing materials later.
Greenhouse plastic film: It is the cheapest option and easy to work with, but degrades under UV exposure within a few seasons.
Polycarbonate panels: It cost more upfront and diffuse light evenly, resist hail, and typically outlast film by years, a common middle-ground choice for a permanent build.
Glass: Looks the part and lasts indefinitely, but it’s heavy, breakable, and the most expensive to buy and to repair if a panel cracks.
Common Mistakes When Building One Yourself
Most greenhouse problems start with small planning errors that become harder to fix once the structure is finished.
Checking the site, drainage, frame alignment, anchoring, ventilation, and roof strength before construction can save time, money, and repairs later.
- Picking a shady spot because it was convenient, not because it gets enough sun
- Building on ground that doesn’t drain
- Skipping the square check on the base frame
- Using ordinary plastic sheeting instead of UV-rated greenhouse film
- Under-anchoring the structure, which shows up the first windy night
- Leaving ventilation as an afterthought
- Sizing the door too small to get equipment or trays through comfortably
- Ignoring snow load in the roof design
Ventilating a DIY Greenhouse
Without airflow, even a well-built structure overheats fast on a sunny day. Roof vents near the peak let the hottest air out, while a low side vent or the door itself pulls in cooler replacement air.
Larger builds sometimes add a small fan to keep air moving on still days, and an automatic vent opener, a wax-filled cylinder that expands with heat, will open a roof vent on its own without any wiring, which is worth the small cost if you’re not around to check on the structure daily.
Conclusion
Building a DIY greenhouse isn’t always a complicated project.
The key elements are choosing the right design for your plot size and budget, building a foundation that is perfectly square and level, and ensuring light and ventilation before you consider the job done.
A beginner gardener will find useful a hoop greenhouse or wooden one, but anyone who is experienced in building may try polycarbonate structures or even old window structures without any additional risks.
Choose the design according to your experience, because you can change the cover in future.
Frequently Asked Questions (FAQs)
1. What’s the Easiest Greenhouse Design for a First-Time Builder?
A PVC hoop house: cheap materials, forgiving construction, and no advanced carpentry required.
2. Is It Actually Cheaper to Build One than To Buy a Kit?
Usually, yes, though your own labor and any material mistakes eat into the savings.
3. Does a Small Backyard Build Need a Real Foundation?
Not necessarily, a gravel bed or timber sill is enough for smaller structures.
4. What’s the Cheapest Material for The Walls?
Greenhouse plastic film costs the least, though it wears out faster than rigid panels.